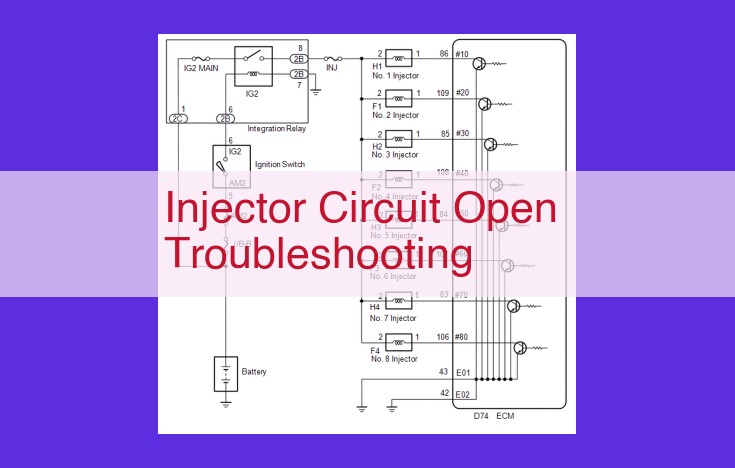
Injector Circuit Open Diagnosis: Troubleshooting Guide For Maximum Efficiency
Injector circuit open troubleshooting involves identifying symptoms, using a scanner for diagnostics, and inspecting the wiring harness, injector, power supply, and ground circuit. This includes testing injector resistance, examining the injector connector, analyzing the injector drive signal, and replacing faulty components such as the injector or injector driver. Through these steps, the root cause of the injector circuit open can be identified and resolved.
Diagnosing and Troubleshooting an Injector Circuit Open: A Comprehensive Guide
An injector circuit open is a prevalent automotive issue that can manifest a range of unpleasant symptoms. Identifying these signs is crucial for prompt diagnosis and resolution.
- Engine Misfires: Open injector circuits can lead to incomplete combustion, resulting in noticeable engine misfires and rough idling.
- Reduced Power and Fuel Economy: An inoperable injector prevents adequate fuel delivery, diminishing engine power and compromising fuel efficiency.
- Rough Start or No Start: When multiple injectors are affected, the engine may struggle to start or fail to start altogether due to insufficient fuel injection.
- Check Engine Light Illumination: Injector circuit opens can trigger the illumination of the Check Engine Light, signaling a problem within the fuel injection system.
**Scanner Diagnostics: Unraveling Injector Pulse Signals and ECU-Injector Driver Anomalies**
When faced with an injector circuit open, a diagnostic scanner becomes your invaluable investigative tool. It unveils the secrets of injector pulse signals, providing pivotal insights into the performance of both the ECU and the injector driver.
The scanner’s piercing gaze detects whether injector pulse signals are present, absent, or erratic. From this pulse analysis, it adeptly unveils potential issues within the ECU, which orchestrates injector operation, and the injector driver, which transmits signals to the injector.
By delving into scanner data, you embark on a diagnostic odyssey. It’s a journey that leads you to pinpoint the root of the injector circuit open, illuminating the path to a swift resolution. Embrace the scanner, for it holds the key to unlocking the mysteries of your fuel injection system.
Wiring Harness Inspection: A Crucial Step in Diagnosing Injector Circuit Opens
When it comes to diagnosing injector circuit opens, there’s no shortage of potential culprits. But one area that often gets overlooked is the wiring harness.
The wiring harness is the network of wires that connects the injector to the ECU and other components. It’s responsible for carrying the signals that tell the injector when to open and close. Any damage or interruption in the wiring harness can cause an injector circuit open, leading to a host of engine problems.
That’s why it’s essential to thoroughly inspect the wiring harness as part of your diagnostic process. Here’s how to do it:
Visual Inspection
Start by visually inspecting the wiring harness for any obvious signs of damage. Look for cuts, breaks, or fraying. Also, pay attention to the connectors. Make sure they’re properly seated and free of corrosion or damage.
Continuity Test
Once you’ve completed the visual inspection, it’s time to perform a continuity test. This will help you identify any open circuits in the wiring harness. To do this, you’ll need a multimeter.
Set your multimeter to the continuity setting. Then, connect one probe to one end of the wire you’re testing and the other probe to the other end. If the multimeter beeps, there’s continuity in the wire. If it doesn’t beep, there’s an open circuit.
Repairing Open Circuits
If you find any open circuits in the wiring harness, you’ll need to repair them. This can be done by soldering or crimping the wires together. Be sure to use heat shrink tubing to protect the repaired connection.
Once you’ve repaired all of the open circuits, reconnect the wiring harness and retest the injector circuit. If the injector is now functioning properly, you’ve successfully diagnosed and repaired the problem.
Identifying and Resolving Open Circuits in Injector Circuits: A Step-by-Step Guide
Every injector is a crucial component in the smooth functioning of an engine. When an injector circuit experiences an open, it can lead to a range of performance issues that can leave you stranded. This guide will provide a step-by-step approach to identify and resolve open circuits in injector circuits, empowering you to get your engine back to optimal performance.
1. Symptom Identification
The telltale signs of an injector circuit open include:
- Rough idling or engine misfiring
- Reduced power output and acceleration
- Check engine light illumination
2. Scanner Diagnostics
Connect a diagnostic scanner to your vehicle to pinpoint the affected injector. It can display injector pulse signals and help identify potential issues with the ECU or injector driver.
3. Wiring Harness Inspection
Thoroughly inspect the injector wiring harness for any visible damage, loose connections, or corrosion. Use a multimeter to test continuity and identify any open circuits within the wiring.
4. Injector Replacement
Disconnect the injector in question. Measure its resistance using a multimeter and compare it to the specified values in your vehicle’s service manual. If the resistance is abnormally high or indicates an open circuit, replace the injector.
5. Power Supply Verification
Using a multimeter, measure the voltage at the injector connector. Inadequate voltage suggests problems with power distribution or wiring faults.
6. Ground Circuit Testing
Ensure continuity between the injector connector’s ground terminal and the vehicle’s chassis ground. Clean or repair any loose or corroded ground connections to resolve open circuits.
7. Injector Connector Examination
Disconnect the injector connector and inspect it for bent, damaged, or corroded pins. Refer to a pinout diagram for pin assignments. Clean, repair, or replace the connector as necessary.
8. Injector Driver Analysis
Utilize an oscilloscope to analyze the injector drive signal. Look for weak or missing signals that could indicate issues with the ECU or injector driver. Replace faulty components accordingly.
9. Injector Resistance Measurement
With the injector disconnected, use a multimeter to measure its resistance. Compare the results with the specified values in your vehicle’s service manual. A high or abnormally low resistance may indicate a faulty injector that needs replacement.
Troubleshooting Injector Circuits: Verifying Power Supply to Injectors
The electrical system in your vehicle plays a crucial role in powering and controlling various components, including fuel injectors. When an injector circuit opens, it can disrupt the proper functioning of the injector, leading to engine performance issues. To resolve this problem, it’s essential to verify the power supply to the injector.
Measuring Voltage at Injector Connector
To check the power supply, you’ll need a multimeter. Set the multimeter to measure DC voltage. Disconnect the injector connector, making sure to note the pin assignments for later reconnection. Using the multimeter, place the positive probe on the power terminal of the injector connector and the negative probe on a good chassis ground.
Observe the multimeter reading. The voltage should be within specifications, typically ranging from 12 to 14 volts. If the voltage is significantly lower or absent, it could indicate problems with the power distribution system or the wiring to the injector.
Troubleshooting Power Supply Issues
If the voltage is low, start by inspecting the battery and charging system. Ensure that the battery is properly connected and has a good charge. Check the alternator connections and test its output voltage to verify that it’s functioning correctly.
Next, examine the wiring harness for any breaks or loose connections. Corrosion can also cause resistance and affect power supply. Trace the wiring from the injector to the power source, looking for any visible damage or corrosion.
If the wiring appears intact, the problem may lie with the circuit itself. Use a circuit tester or multimeter to measure continuity throughout the circuit, ensuring that there are no open circuits.
Additional Tips
Once the power supply to the injector has been verified, reconnect the injector connector and inspect the injector for proper operation. You may need to use a diagnostic scan tool to check for fault codes or perform further tests.
By following these steps, you can effectively troubleshoot and resolveinjector circuit open issues, ensuring optimal engine performance and fuel efficiency.
Troubleshooting Injector Circuit Open: Ground Circuit Testing
Identifying and resolving a ground circuit open is crucial in diagnosing an injector circuit open. The ground circuit provides a path for electricity to return to the vehicle’s chassis, completing the electrical circuit. When this circuit is faulty, the injector can’t receive the necessary power to operate, resulting in engine problems.
To test the ground circuit:
- Disconnect the injector connector.
- Locate the ground terminal on the injector connector. It’s typically marked with a black wire.
- Use a multimeter to test continuity between the ground terminal and the vehicle’s chassis ground.
- If there’s no continuity, check for corrosion, loose connections, or damaged wires along the ground circuit.
- Clean or repair any identified issues to restore continuity.
By ensuring a sound ground circuit, you can eliminate potential issues that could prevent the injector from receiving the proper electrical current. This step is essential in the comprehensive diagnosis of an injector circuit open and can help resolve engine problems related to injector malfunction.
Examining the Injector Connector: A Crucial Step in Diagnosing Injector Circuit Open
When troubleshooting an injector circuit open, examining the injector connector is crucial for identifying potential issues. The connector serves as the bridge between the injector and the vehicle’s electrical system, transmitting vital signals and power.
Before disconnecting the injector connector, refer to a pinout diagram to familiarize yourself with the pin assignments. This diagram will provide a roadmap for identifying bent, damaged, or corroded pins.
Gently disconnect the connector by pressing the release tab and pulling it straight out. Thoroughly inspect both the male and female sides of the connector. Look for any bent or damaged pins, which can disrupt electrical connections. Examine the connector for corrosion, which can create resistance and interfere with signal transmission.
If you discover any damaged or corroded pins, repair or replace them as necessary. Use a small pick tool to gently straighten any bent pins, but be careful not to apply excessive force that could break them. For heavily corroded or damaged connectors, it’s best to replace the entire connector to ensure optimal performance.
Reattach the connector firmly, ensuring that it clicks into place. Loose connections can result in unreliable signals and power delivery, exacerbating the open circuit issue. After reconnecting, use a multimeter to verify continuity between the injector connector’s terminals and the corresponding wiring harness leads.
By carefully examining the injector connector and addressing any anomalies, you can effectively eliminate potential sources of injector circuit open and ensure proper injector operation.
Troubleshooting Injector Drive Issues: A Comprehensive Guide
Identifying the Cause of Open Injector Circuits
Diagnose and resolve injector circuit issues with this comprehensive guide. Learn how to pinpoint the cause, from symptom recognition to injector driver analysis, and restore optimal engine performance.
1. Injector Drive Signal Analysis
Using an oscilloscope, meticulously examine the injector drive signal. Uncover weak or missing signals that may point to underlying issues within the ECU or injector driver. Promptly replace faulty components to ensure proper injector operation.
2. Troubleshooting Weak or Missing Signals
Delve into the root cause of weak or missing injector drive signals. Assess the ECU’s performance, considering potential software glitches or hardware malfunctions. Additionally, thoroughly inspect the wiring harness for open circuits or loose connections that could disrupt signal transmission.
3. ECU and Injector Driver Replacement
After confirming a faulty ECU or injector driver, replace the affected component. This critical step restores the proper injector drive signal, eliminating engine performance issues and restoring smooth operation.
4. Additional Considerations
Beyond the ECU and injector driver analysis, consider the following:
- Wiring harness inspection: Check for damaged or loose wires that may affect signal transmission.
- Injector resistance measurement: Ensure the injector’s resistance falls within specified tolerances.
- Injector connector examination: Inspect for bent or corroded pins that impede proper electrical contact.
By following these comprehensive troubleshooting steps, you can pinpoint the root cause of injector drive issues, ensuring a swift and effective resolution. This will restore optimal engine performance and prevent future problems, keeping your vehicle running smoothly.
Diagnosing an Open Injector Circuit: The Ultimate Guide
Your car’s engine is a marvel of engineering, but like any complex system, it can encounter issues that affect its performance. One such issue is an open injector circuit, which can cause a range of symptoms, from engine misfires to decreased fuel efficiency.
Identifying Open Injector Circuit Symptoms
- Engine misfires: A faulty injector can prevent fuel from reaching the engine cylinder, causing misfires and rough idling.
- Reduced power: The engine may feel sluggish and unresponsive due to the lack of proper fuel injection.
- Fuel odor: Unburned fuel may escape from the exhaust, creating a noticeable fuel smell.
- Check Engine light: Your car’s computer may detect the injector malfunction and illuminate the Check Engine light.
Diagnosing the Problem
To pinpoint the exact cause of an open injector circuit, follow these steps:
Scanner Diagnostics
Use an automotive diagnostic scanner to access the vehicle’s computer system. Check for injector pulse signals to determine if the Engine Control Unit (ECU) or injector driver is sending the correct signal to the injector.
Wiring Harness Inspection
Examine the injector wiring harness for any signs of damage, loose connections, or corrosion. Use a multimeter to test for continuity to rule out open circuits in the wiring.
Power Supply Verification
Measure the voltage at the injector connector using a multimeter. A voltage reading below specifications indicates problems with the power distribution or wiring.
Ground Circuit Testing
Ensure a secure connection between the injector connector’s ground terminal and the vehicle’s chassis ground using a multimeter. Identify and resolve any open circuits by cleaning or repairing ground connections.
Injector Connector Examination
Disconnect the injector connector and inspect it for bent, damaged, or corroded pins. Use a pinout diagram to identify the pin assignments and repair or replace the connector as needed.
Injector Driver Analysis
Connect an oscilloscope to analyze the injector drive signal. Weak or missing signals may indicate an issue with the ECU or injector driver. Replace faulty components accordingly.
Injector Resistance Measurement
Unplug the injector and measure its resistance using a multimeter. Compare the results with the manufacturer’s specifications. Open circuits or unusually high resistance are indicators of a faulty injector.