Drip Edge And Tar Paper: Essential Roof Protection For Enhanced Longevity
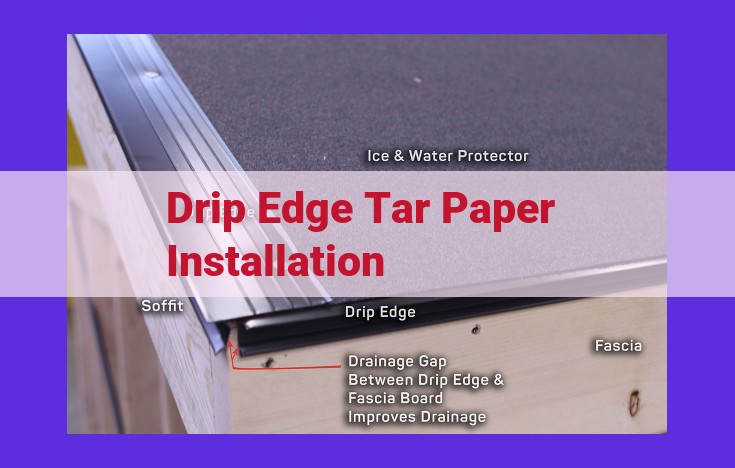
Drip edge tar paper installation protects a roof’s edge by directing water away from the fascia and soffit. The drip edge, typically made of aluminum or galvanized steel, is installed along the roof’s perimeter to provide a barrier against moisture penetration. Tar paper, also known as roofing felt, is a waterproof membrane that is laid over the roof deck before shingles are installed. It acts as an additional barrier against water and moisture, providing extra protection for the roof’s integrity and longevity.
Drip Edge: Protecting the Roof’s Edge
Overview of Drip Edge Purpose and Function
A drip edge is an essential component of any roofing system, especially in areas with frequent rainfall. It’s a thin metal strip installed along the roof’s edge to protect it from water damage. By directing rainwater away from the roof’s edge, it prevents it from seeping into the eaves or fascia, which can lead to costly repairs.
Types of Drip Edge Materials and Their Characteristics
Drip edges can be made from a variety of materials, including:
- Aluminum: Lightweight, durable, and resistant to corrosion.
- Galvanized steel: Similar to aluminum, galvanized steel is sturdy and rust-resistant.
- Copper: A long-lasting and aesthetically pleasing option, but more expensive than others.
- Vinyl: Flexible and easy to install, but less durable than metal options.
The best choice for your roof will depend on factors such as the climate in your area, the type of roofing material, and your budget.
Tar Paper: The Unsung Hero of Roofing
Nestled between the roof deck and shingles, tar paper, also known as roofing felt, plays a crucial role in protecting your home from the relentless onslaught of the elements. Let’s delve into the secrets of this often-overlooked roofing component.
Composition and Benefits of Tar Paper
Tar paper is crafted from a blend of recycled paper fibers and asphalt. This combination imparts exceptional water resistance, making it an ideal barrier against rain, snow, and moisture. Additionally, tar paper boasts strength and durability, resisting tearing and punctures. Its flexibility allows it to conform to the contours of your roof, ensuring a seamless and effective seal.
Functions of Tar Paper in a Roofing System
Tar paper serves an array of essential functions within a roofing system:
-
Waterproofing: It acts as a primary barrier against water intrusion, diverting it away from the roof deck and into the gutters.
-
Temperature Protection: Tar paper helps regulate temperature by insulating the roof from extreme heat and cold, contributing to energy efficiency.
-
Support for Shingles: It provides a stable and uniform surface for shingles to adhere to, ensuring their secure installation and long-lasting performance.
Relationship with Drip Edge and Its Importance
Tar paper works in tandem with drip edge, a metal flashing installed along the eaves and rakes. Together, they form a watertight shield that prevents water from seeping into the roof deck. Drip edge channels water away from the edges of the roof, while tar paper provides additional protection and prevents wind-driven rain from penetrating the underlying layers.
Without tar paper, water could penetrate around the drip edge and compromise the roof’s integrity. Conversely, without drip edge, water could overflow the eaves and cause damage to the fascia and siding. Thus, their combined action is crucial for a robust and watertight roofing system.
Installation Essentials: Drip Edge and Tar Paper for Optimal Roofing Protection
Installing drip edge and tar paper is a crucial step in ensuring the longevity and water resistance of your roof. Let’s navigate the essential steps involved to achieve a secure and effective installation:
Step 1: Install the Drip Edge
- Start by aligning the drip edge with the roof’s edge and nailing it into place every 12-16 inches.
- Ensure a 1-2 inch overhang over the fascia board to allow for proper water drainage.
Step 2: Secure the Drip Edge and Overlap Tar Paper
- Overlap the tar paper at least 6 inches over the drip edge.
- Use tar paper nails or roofing staples to secure the tar paper to the roof deck.
- Drive the nails about 1 inch into the wood sheathing, ensuring they are not too close to the edge to prevent tearing.
Step 3: Install Tar Paper Properly
- Unroll the tar paper from the bottom of the roof.
- Overlap the tar paper at least 6 inches in horizontal rows.
- Staple or nail the tar paper to the roof deck with roofing nails. Ensure the nails are spaced about 6 inches apart.
- Avoid any gaps or creases in the tar paper by smoothing it out as you install it.
By following these meticulous steps, you can effectively install drip edge and tar paper, laying the foundation for a durable and watertight roof.
Starter Strip: The Foundation for Your Roof’s Success
Your roof is one of the most important parts of your home, so it’s essential to make sure it’s installed correctly. One of the most important components of a roof is the starter strip, which is the first layer of shingles that are installed.
What is a Starter Strip?
A starter strip is a narrow strip of shingles that is installed along the eaves of the roof. It helps to protect the shingles from the elements, and it also provides a straight edge for the rest of the shingles to be installed against.
Why is a Starter Strip Important?
There are a number of reasons why it’s important to use a starter strip when installing a new roof:
- Prevents shingles from blowing off: The starter strip helps to keep the shingles in place, even in high winds. This is especially important in areas that are prone to hurricanes or tornadoes.
- Improves water resistance: The starter strip helps to keep water out of the roof, which can prevent leaks and damage.
- Extends the life of your roof: A properly installed starter strip can help to extend the life of your roof by protecting it from the elements.
How to Install a Starter Strip
Installing a starter strip is a relatively simple process, but it’s important to do it correctly to ensure that your roof is properly protected. Here are the steps on how to install a starter strip:
- Prepare the eaves: Before you install the starter strip, you need to prepare the eaves of the roof. This involves making sure that the eaves are clean and free of debris.
- Apply the starter strip: Once the eaves are prepared, you can apply the starter strip. Start by unrolling the starter strip along the eaves. Then, nail the starter strip into place using roofing nails.
- Overlap the starter strip: Once the starter strip is nailed into place, you need to overlap it with the first course of shingles. The overlap should be at least 2 inches.
- Nail the shingles: Once the starter strip is overlapped, you can nail the shingles into place. Start by nailing the shingles along the bottom edge, and then work your way up the roof.
By following these steps, you can ensure that your starter strip is properly installed and that your roof is protected from the elements.
Eaves, Fascia, and Gutter: Managing Rainwater Flow
- Understanding the components and their functions
- Benefits of proper eaves, fascia, and gutter installation
- Maintenance tips to ensure optimal water drainage
Eaves, Fascia, and Gutter: The Trio for Seamless Rainwater Management
In a world where protecting your home from the elements is paramount, the interplay between eaves, fascia, and gutters plays a crucial role. These components form a harmonious trio, working together to channel rainwater away from your roof and foundation, safeguarding your precious abode.
Unveiling the Components
-
Eaves: Extending from the roof’s edge, eaves provide a protective overhang, shielding windows, doors, and walls from rain.
-
Fascia: As the finishing touch, fascia conceals the roof’s edge, adding a polished look while protecting vulnerable areas from moisture damage.
-
Gutter: The backbone of rainwater management, gutters collect and divert water from eaves, preventing it from pooling around your home.
Benefits of a Well-Installed System
A properly installed eaves, fascia, and gutter system offers numerous benefits:
-
Prevention of Water Damage: By effectively channeling water away from your roof and foundation, this system minimizes the risk of leaks, rot, and other costly water-related damage.
-
Enhanced Curb Appeal: A well-maintained eaves, fascia, and gutter system complements your home’s exterior, enhancing its aesthetics and increasing its value.
-
Extended Roof Life: By diverting water away from the roof, this system helps extend its lifespan, protecting your investment in years to come.
Maintenance Tips for Optimal Performance
To ensure your eaves, fascia, and gutter system functions optimally, regular maintenance is essential:
-
Regular Cleaning: Remove debris, such as leaves and twigs, from gutters and downspouts to prevent blockages.
-
Inspection: Periodically inspect the system for any signs of damage, loose connections, or rust.
-
Repairs: If damage is detected, address it promptly to avoid further issues and maintain the system’s integrity.
The harmonious collaboration of eaves, fascia, and gutters is vital for safeguarding your home from the damaging effects of rainwater. By understanding the components, their benefits, and maintenance tips, you can ensure your trio of protectors performs seamlessly, keeping your home dry and beautiful for years to come.
Downspouts: The Final Chapter of Your Drainage Masterpiece
When it comes to safeguarding your home from the deluge of rain, downspouts play a crucial role as the unsung heroes of your drainage system. Picture them as the mighty warriors standing guard, channeling water away from your precious abode.
The Vital Link: Downspouts and Gutters
Downspouts are the conduits that connect gutters to the ground, ensuring a seamless transfer of rainwater from the roof. Without them, the gutters would become overwhelmed, potentially causing costly water damage to your home’s exterior and foundation.
Routing Considerations: Guiding the Water’s Path
The route your downspouts take is of paramount importance. Sloping the downspouts slightly downward allows water to flow smoothly, while keeping them at a safe distance from your home prevents water from seeping into your basement.
A Tale of Two Downspouts: Types and Advantages
Various types of downspouts exist, each with its own set of benefits:
- Round Downspouts: The traditional choice, these downspouts are durable and easy to install.
- Rectangular Downspouts: Sleeker and more stylish, rectangular downspouts add a modern touch to your home’s exterior.
- Half-Round Downspouts: A compromise between round and rectangular, these downspouts offer a classic look with a modern twist.
The Choice is Yours: Choosing the Perfect Downspout
The best downspout for your home depends on your style preferences, budget, and the amount of water you need to divert. Consider your home’s architecture, surrounding landscape, and rainfall patterns to make an informed decision.
Maintaining Your Drainage Guardians
Regularly cleaning and inspecting your downspouts is essential to ensure they remain in tip-top shape. Clear any debris, such as leaves and sticks, that may obstruct the flow of water. Inspect for rust or damage and address any issues promptly to prevent costly repairs down the road.