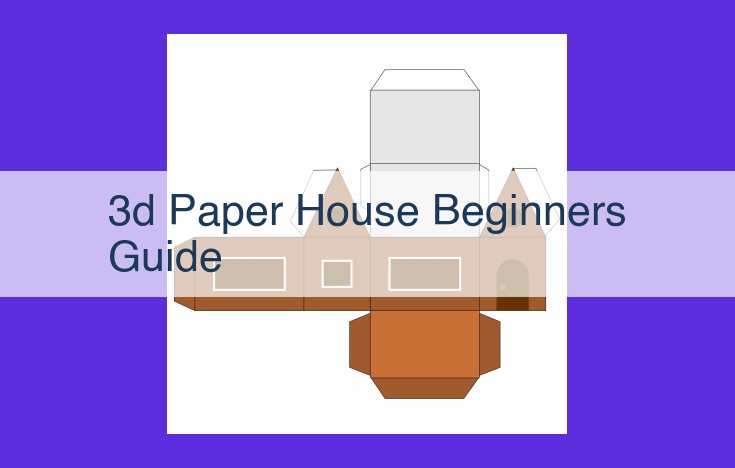
Craft Your Architectural Masterpiece: A Comprehensive Guide To 3D Paper Architecture For Beginners
Embark on an immersive adventure in 3D paper architecture with this beginner’s guide. Discover the secrets of origami, kirigami, and pop-up paper art to create stunning structures. Learn essential assembly methods using glue, adhesives, and interlocking joints. Explore basic materials, tools, and design principles to ensure stability and aesthetics. Master architectural elements like columns, arches, vaults, and domes. Address common challenges and find solutions for paper tearing, weak joints, and stability. Finally, add finishing touches with paints, textures, and embellishments to bring your paper house to life.
Beginner’s Guide to the Enchanting World of 3D Paper Architecture
Welcome to the captivating world of 3D paper architecture, where the mundane material of paper transforms into extraordinary structures that spark imagination and ignite creativity. Whether you’re a passionate crafter or a curious beginner, this beginner’s guide will lead you on an architectural adventure, empowering you to create your own mesmerizing paper masterpieces.
Unveiling the Techniques
The realm of 3D paper architecture encompasses a myriad of techniques that breathe life into paper. Origami, the art of paper folding, allows intricate designs to emerge from a single sheet of paper. Kirigami combines cutting and folding to produce delicate structures that resemble paper sculptures. And pop-up paper art brings movement and dynamism to paper creations, making them interactive art pieces that surprise and delight.
Assembling Your Paper Palace
Transforming flat sheets of paper into three-dimensional wonders requires a careful selection of assembly methods. Glue and tape provide a versatile and easy-to-use solution for secure connections, while specialized adhesives offer precision and durability. For a more integral bond, interlocking joints allow paper pieces to fit together snugly, creating stable structures that withstand the test of time.
Materials and Tools: Your Creative Arsenal
The foundation of your paper architecture lies in the materials and tools you choose. Paper of varying weight and quality will determine the strength and pliability of your creations. Scissors with sharp blades ensure precise cutting, while rulers and pencils guide your designs with accuracy and precision. These humble tools are the keys to unlocking your architectural potential.
Design Principles: The Blueprint of Beauty
Creating harmonious and visually appealing paper structures requires an understanding of basic design principles. Symmetry brings balance to your designs, while balance distributes weight evenly for stability. Proportion ensures pleasing relationships between different elements, and scale determines the size of your model relative to its intended purpose. These principles will guide you towards creating structures that are both aesthetically pleasing and structurally sound.
Origami: The Art of Paper Transformation
In the realm of 3D paper architecture, origami stands as an enchanting art form where paper is transformed with the magic of folding. This ancient Japanese technique has captivated artists for centuries, allowing them to create stunningly intricate designs and three-dimensional sculptures from a single sheet of paper.
Origami, meaning “folded paper” in Japanese, is rooted in simplicity. Its allure lies in its ability to turn a humble piece of paper into something extraordinary. With precision and patience, skilled origami artists use a series of mathematical folds to create geometric shapes, stylized animals, and even dynamic structures.
The intricacy of origami designs ranges from simple beginner-friendly projects to mind-boggling creations that require years of practice. From the iconic crane to the complex dragon, each fold infuses the paper with life, bringing forth unexpected and breathtaking forms.
Origami not only fosters creativity and spatial reasoning but also cultivates a sense of calm and focus. The repetitive nature of folding encourages mindfulness and helps practitioners develop a deep connection with the material.
Its versatile nature extends beyond aesthetic appeal. Origami has also found practical applications in fields such as engineering, architecture, and medicine. By harnessing the strength and flexibility of folded paper, researchers are exploring innovative solutions to real-world problems.
Whether you’re a seasoned artist or embarking on your first origami journey, this timeless craft invites you to explore the boundless possibilities of paper folding. Embrace the allure of origami and witness the transformation of ordinary paper into extraordinary works of art.
Kirigami: The Art of Cutting and Folding Paper
Kirigami, the ancient Japanese art of paper cutting and folding, invites you to embrace the intricate beauty of paper architecture. Unlike origami, which solely relies on folding, kirigami incorporates precise cuts to create mesmerizing three-dimensional structures.
Imagine a blank sheet of paper transformed into an elegant latticework or a graceful butterfly. Kirigami empowers you to unleash your creativity by carefully cutting and folding, revealing hidden shapes and patterns that dance before your very eyes.
The art of kirigami is often seen as a meditative practice, where the precision of your cuts and the gentle folding of paper become a form of mindfulness. With each intentional movement, you breathe life into paper, creating intricate masterpieces that captivate.
Kirigami techniques range from simple pop-up cards to elaborate sculptures. Whether you’re a beginner or an experienced paper architect, this versatile art form offers endless possibilities for exploration.
So, gather your sharp scissors, a steady hand, and embark on a paper-cutting odyssey with kirigami. Let the beauty of transformed paper inspire you to create structures that will captivate and delight all who behold them.
Pop-up Paper Art: Unfolding Dynamic Paper Creations
Delve into the Enchanting World of Pop-up Paper Art
In the realm of paper architecture, pop-up paper art stands out as a captivating form that brings designs to life. These intricate creations possess an irresistible charm, captivating the hearts of both artists and enthusiasts alike.
Unveiling the Secret Mechanisms
Pop-up paper creations employ clever mechanisms to achieve their astonishing transformations. When a specific point is pressed or a page is turned, hidden structures unfold and leap into view. This magical effect is made possible by carefully designed paper folds and cuts.
The Art of Cutting and Folding
The key to creating pop-up paper art lies in the precise cutting and folding of paper. These intricate techniques allow for the creation of multi-layered structures that conceal or reveal elements in a captivating manner.
Crafting a Dynamic Journey
Pop-up paper art transcends static designs. It invites you on a journey of discovery as you interact with the creation. Each turn of a page, each gentle press, unveils a new perspective and sparks a sense of wonder.
Endless Possibilities
The realm of pop-up paper art is boundless. From whimsical scenes to architectural marvels, these creations can embody any imaginable concept. Whether you’re an experienced artist or just starting your paper-crafting adventure, the possibilities are limitless.
Engage Your Audience with Interactive Art
Harness the power of pop-up paper art to engage your audience on a multisensory level. Interactive greetings cards, captivating storybooks, and dynamic presentations can leave a lasting impression that your audience will cherish.
A Personal Touch
Pop-up paper art also offers a personalized touch to your creations. Whether you’re crafting a heartfelt gift or adding a unique element to your home décor, the ability to customize and embellish these paper wonders makes them a truly special expression of yourself.
So, embark on the enchanting journey of pop-up paper art. Unleash your creativity, explore the possibilities, and delight your audience with the magic of unfolding paper creations.
Glue and Tape: Strong Bonds for Your 3D Paper Creations
In the realm of 3D paper architecture, glue and tape are your trusty companions, helping you connect intricate paper pieces with precision and strength. These adhesives play a crucial role in transforming flat paper into captivating three-dimensional structures.
Glue:
- White Glue: A classic choice for paper crafting, white glue dries clear and forms a strong bond. Use it for larger pieces and when you need a durable hold.
- PVA Glue: Specifically designed for paper, PVA glue provides a flexible and water-resistant bond. Ideal for delicate structures and when you want to avoid warping.
- Mod Podge: A versatile glue and sealer, Mod Podge not only bonds paper but also protects it from moisture and wear. Use it for finishing touches and adding a glossy sheen.
Tape:
- Clear Tape: A go-to option for invisible connections, clear tape is perfect for securing small pieces and creating invisible seams.
- Masking Tape: Essential for temporary holds, masking tape leaves no residue and is great for positioning pieces before gluing.
- Double-Sided Tape: A strong and convenient choice for hidden connections, double-sided tape bonds both sides of paper for a secure hold.
Tips for Strong Glue and Tape Connections:
- Clean the surfaces before gluing to ensure a strong bond.
- Apply glue or tape sparingly, only where necessary.
- Use a small brush or toothpick to apply glue for precision.
- Press or clamp the glued pieces together firmly.
- Allow the glue to dry completely before handling.
- Reinforce large or heavy structures with additional layers of glue or tape.
Adhesives: The Secret to Enduring Paper Architecture
In the realm of 3D paper architecture, precise and durable bonds are the foundation of every masterpiece. Enter the world of specialized adhesives, your secret weapon for creating paper constructions that stand the test of time.
These professional-grade adhesives are not your everyday school glue or tape. They are formulated with advanced polymers and bonding agents that penetrate the paper fibers, forming permanent and unyielding connections.
With surgical precision, you can carefully apply these adhesives to the intricate edges of your paper models. Watch in awe as they ooze into the microscopic spaces, locking the structure together with an invisible yet unbreakable force.
No matter the complexity of your design, the right adhesive will embrace it, allowing you to construct towering skyscrapers, graceful arches, and expansive vaults that defy gravity.
From experimental creations to cherished keepsakes, specialized adhesives empower you to breathe life into your paper dreams. So, let these unsung heroes guide you in your journey as you transform ordinary paper into extraordinary architectural wonders.
Interlocking Joints: The Secret to Stable Paper Architecture
In the captivating realm of 3D paper architecture, interlocking joints emerge as the unsung heroes, silently safeguarding your delicate creations against the forces of gravity and chaos. These ingenious techniques transform flimsy sheets of paper into sturdy structures that defy all expectations.
Just as interlocking fingers form an unyielding grip, paper joints engage in a similar dance, seamlessly uniting paper pieces into a cohesive whole. Imagine a puzzle, where each piece fits snugly into its designated slot, creating a rigid and stable framework.
One popular interlocking method involves tongue-and-groove joints. Picture two pieces of paper, each resembling a tongue and a groove. The tongue, carefully cut with a sharp blade, slides effortlessly into the groove, forming a secure connection that resists twisting and bending.
Another variation is the box joint, a marvel of precision and symmetry. Like a perfectly fitted box, the protruding edges of one paper piece interlock with the slots of another, creating a strong and durable bond. This technique is particularly useful for column connections, where vertical support elements need to withstand significant weight.
Embracing the art of interlocking joints will not only enhance the stability of your paper house but also elevate its aesthetic appeal. The interlocking lines and angles add a touch of sophistication and architectural flair to the design.
Mastering the technique of interlocking joints is the key to unlocking the full potential of 3D paper architecture. So, embrace the challenge, sharpen your tools, and let your imagination soar as you weave together paper parts into breathtaking structures that will stand the test of time.
Paper: The Canvas for Your Architectural Masterpiece
In the realm of 3D paper architecture, paper becomes the canvas upon which your architectural dreams come to life. Selecting the right paper weight and type is a crucial step that will lay the foundation for the strength, durability, and aesthetics of your creation.
Lightweight Papers: Wings of Delicacy
-
Origami Paper: A whisper-thin treasure with remarkable flexibility, it’s ideal for intricate origami designs that dance with the slightest breeze.
-
Tissue Paper: A gentle and ethereal medium, perfect for creating delicate flowers, fluttering butterflies, and ephemeral structures that seem to defy gravity.
Midweight Papers: Versatile and Balanced
-
Cardstock: A more robust choice that provides a balance between strength and flexibility. Its rigidity allows for precise cuts and intricate folds, making it suitable for pop-up cards, architectural models, and sturdy towers.
-
Poster Paper: With a smooth surface and slight sheen, it’s ideal for printing architectural plans and creating vibrant, large-scale displays.
Heavyweight Papers: Fortresses of Durability
-
Bristol Board: A sturdy and thick paper that can withstand the weight of complex structures and multiple layers. It’s perfect for building tall skyscrapers, sturdy bridges, and imposing castles.
-
Chipboard: The heavyweight champion of paper, chipboard provides exceptional strength and dimensional stability. Use it to create foundation plates, support beams, and any other elements that demand unwavering resilience.
Matching Paper to Your Vision
The type of paper you choose will ultimately depend on your desired architectural style and the complexity of your design. Consider the weight, thickness, and texture of the paper to ensure it complements your vision and provides the necessary support and structural integrity.
With the right paper as your foundation, you’re ready to embark on the enchanting journey of 3D paper architecture, where imagination and paper intertwine to create architectural wonders that defy the boundaries of traditional construction.
Scissors: The Sharp Edge of Paper Architecture
In the realm of 3D paper architecture, scissors are the equivalent of a sculptor’s chisel. As the gatekeepers of precision, they wield the power to transform ordinary paper into intricate masterpieces. For beginners embarking on their paper-folding journey, selecting the right pair of scissors is paramount.
Sharpness Matters
The most important quality of scissors for paper architecture is their sharpness. A blunt pair will tear the paper, creating ragged edges that compromise the integrity of your structures. Instead, opt for scissors with precision-ground blades that slice through paper effortlessly, leaving clean and crisp cuts.
Imagine yourself as a skilled surgeon, delicately dissecting the paper, creating perfectly aligned edges that form the foundation of your paper edifice. Sharp scissors empower you with the control you need to execute intricate designs and ensure the structural integrity of your creations.
Ergonomics and Comfort
Your scissors should be not only sharp but also comfortable to hold. Especially if you’re embarking on an extended paper-folding session, the right ergonomics can make all the difference. Choose scissors with comfortable handles that fit your hand size and provide a secure grip. This will minimize fatigue and allow you to focus on the intricate details of your paper masterpiece.
Appropriate Size
The size of your scissors should match the scale of your paper architecture projects. For small, delicate pieces, smaller scissors with finer points will offer greater precision. For larger projects, larger scissors with longer blades will make the cutting process faster and easier.
Types of Scissors
There are various types of scissors available, each with its unique characteristics. For paper architecture, scissors with straight blades are generally preferred, as they provide the most precise cuts. Some scissors may also have curved blades, which can be useful for cutting curves or intricate shapes.
By investing in a pair of sharp, comfortable, and appropriately sized scissors, you are equipping yourself with the essential tool to unlock the wonders of 3D paper architecture. With each cut, you will breathe life into paper, transforming ordinary sheets into extraordinary structures that defy the limitations of imagination.
Rulers and Pencils: Precision and Sketching for Architectural Accuracy
In the realm of 3D paper architecture, precision is paramount. Rulers and pencils serve as your trusty guides, ensuring that your creations stand tall and true.
Every skilled architect knows the importance of accurate measurements. Rulers become your guiding light, allowing you to mark precise distances and ensure that each component of your paper structure aligns perfectly. With a ruler in hand, you can meticulously measure and replicate the dimensions of real-world buildings, bringing them to life in miniature.
Pencils, on the other hand, grant you the power to sketch your architectural vision. Their graphite lines are the blueprints upon which your creations take shape. You can sketch out intricate designs, plan the layout of rooms, and even experiment with different scales and perspectives. Each stroke of your pencil brings your imagination closer to reality.
Together, rulers and pencils form an indispensable duo, empowering you to craft paper structures with exceptional precision. Whether you’re designing a towering skyscraper or a cozy cottage, these tools will guide your hands and ensure that every element of your architecture is perfectly aligned and proportioned.
Symmetry: Striking a Balance for Visual Harmony
In the world of 3D paper architecture, symmetry plays a pivotal role in creating structures that are not only aesthetically pleasing but also exude a sense of balance and tranquility. Whether you’re a novice or an experienced craftsman, understanding the principles of symmetry can elevate your paper creations to new heights.
Imagine a grand palace standing tall with its mirrored facades. Its columns line up perfectly, creating an aura of order and elegance. This is the essence of horizontal symmetry. In paper architecture, you can achieve this by carefully aligning your paper panels along a vertical axis, ensuring that the right and left sides are mirror images of each other.
Vertical symmetry, on the other hand, focuses on balancing elements along a horizontal axis. Think of a majestic cathedral with its tall spires reaching towards the heavens, their towers mirroring each other. In your paper models, you can replicate this effect by arranging your elements vertically, creating a sense of height and grandeur.
Striving for symmetry doesn’t mean your creations have to be perfectly symmetrical. Subtle asymmetries can add character and interest to your structures. The key is to create a sense of balance and harmony, rather than absolute precision. Remember, the goal is to guide the viewer’s eye effortlessly through your design, offering a soothing and aesthetically pleasing experience.
Balance: The Key to Architectural Harmony
In the realm of architecture, balance is paramount. It’s not merely about pleasing aesthetics but also about ensuring the stability and functionality of a structure. As you delve into the world of 3D paper architecture, understanding balance becomes essential.
Imagine a paper house with one side heavy with intricate details while the other is bare. As you assemble it, you may find it toppling over effortlessly. This is where distribution of weight comes into play. Just as a balancing tightrope walker shifts their weight to maintain their equilibrium, your paper creation requires equal distribution across its base.
Horizontal Balance
Horizontal balance refers to the even distribution of weight horizontally. This means that the paper house should not lean to one side or the other. To achieve this, consider the shape of your model. A symmetrical structure, with identical features on both sides, naturally lends itself to horizontal balance. If you opt for an asymmetrical design, carefully place heavier elements to counterbalance lighter ones.
Vertical Balance
Equally crucial is vertical balance. The weight of the paper house should be distributed evenly from the bottom to the top. A towering structure with a weak base is destined to collapse. Ensure that your base is strong enough to support the weight of the upper levels. Consider adding reinforcements or interconnecting the pieces through interlocking joints for added stability.
Overall Stability
Balance encompasses both horizontal and vertical distribution of weight. A well-balanced paper house will resist tipping over and maintain its stability. As you construct, constantly assess the weight distribution and make adjustments as needed. By adhering to the principles of balance, you can create paper architecture that stands proudly, showcasing your meticulous craftsmanship.
Proportion: The Key to Harmony in 3D Paper Architecture
In the realm of 3D paper architecture, proportion takes the spotlight as the guiding principle that harmonizes the different elements of your paper creations. It’s like a delicate dance where each part plays its role in creating a balanced and visually pleasing masterpiece.
Imagine yourself as a conductor leading an orchestra of paper components. You have columns, arches, roofs, and windows, each with its own unique rhythm and purpose. Your task is to coordinate these elements – adjusting their size, shape, and placement – to achieve a harmonious symphony.
Strive for a balance between the various components, ensuring that no element dominates or overshadows the others. Consider the relative heights of columns, the widths of arches, and the slopes of roofs. By carefully calibrating these proportions, you create a sense of unity and cohesion, where each element complements the next.
Scale is another crucial aspect of proportion. Your 3D paper architecture should maintain a realistic sense of size and proportion. If you’re constructing a miniature dollhouse, for example, your columns should be scaled down accordingly to create a believable and immersive environment. Similarly, if you’re building a grand palace, don’t skimp on the dimensions – let your paper masterpiece soar to impressive heights, reflecting the grandeur of its architectural inspiration.
By mastering the art of proportion, you elevate your 3D paper architecture from mere models to captivating works of art. It’s a skill that transforms your creations into visually stunning and harmonious entities, capturing the essence of architectural principles and breathing life into the world of papercraft.
Scale: Explain determining the appropriate size for the paper model.
Determine the Perfect Scale for Your Paper Architecture Creation
When embarking on the captivating journey of 3D paper architecture, meticulous attention to scale is paramount. The scale of your model dictates its relative size to the real-world counterpart, influencing its overall aesthetics and practicality.
Imagine constructing a majestic palace that towers over your desk, or a miniature cottage that fits snugly in the palm of your hand. The scale you choose will govern not only the physical dimensions of your creation but also its level of detail and complexity.
For beginners, a 1:24 scale is an excellent starting point. This scale offers a generous size that allows for intricate designs and decorative elements without overwhelming you with an abundance of parts. It’s the perfect compromise between detail and manageability.
Once you gain confidence, you can experiment with smaller scales like 1:48 or 1:50. These scales lend themselves to intricate facades and highly detailed interiors that mimic the grandeur of real-world structures.
However, if your heart yearns for a colossal undertaking, consider larger scales such as 1:12 or 1:8. Prepare for an adventure where every architectural feature is amplified, offering ample space for elaborate embellishments and stunning architectural details.
Remember, the scale you choose is not merely a technicality but a canvas that empowers you to bring your architectural visions to life. By carefully considering the scale, you can create a paper house that resonates with your imagination and leaves a lasting impression.
Columns: Teach the construction of vertical support elements.
Columns: The Stalwart Guardians of Paper Architecture
In the realm of 3D paper architecture, columns ascend as the stalwarts of stability, ensuring the integrity of your creations. They embody vertical support, like pillars holding up a mighty cathedral, maintaining the structural balance that brings your paper houses to life.
The construction of paper columns is a meticulous art, requiring precision and attention to detail. Begin by cutting clean, straight strips of paper, the thickness of which will determine the strength and robustness of your columns. Roll the strips tightly, ensuring they maintain a consistent diameter. Secure the ends with a drop of glue or a thin strip of paper.
To achieve structural stability, reinforcing the columns is paramount. This can be done by interlocking several rolled strips together or by adding additional layers of paper to the exterior. It’s important to allow ample drying time before proceeding to ensure a strong bond.
Once the columns have gained their structural integrity, it’s time to integrate them into the overall design of your creation. Determine the spacing and placement of the columns, considering their proportion and scale in relation to the other architectural elements.
As you construct your paper house, envision these columns as miniature guardians, standing tall and providing support. Their presence will lend an air of elegance and grandeur to your creation, transforming it from a mere assemblage of paper into a true architectural masterpiece.
Arches: The Gateway to Architectural Elegance
In the realm of 3D paper architecture, arches stand as majestic gateways that elevate structures from ordinary to extraordinary. These graceful curves not only enhance aesthetic appeal but also serve a crucial functional purpose.
The construction of paper arches requires precision and artistry. Begin by meticulously sketching the design on the paper. Use a sharp blade to carefully cut out the arch shapes. Remember, sharp tools result in clean cuts, enhancing the overall appearance and stability of your arch.
Once cut, carefully bend the paper along the arch’s lines. Use a ruler or straight edge as a guide to ensure uniform curvature. For wider arches, consider using multiple pieces of paper joined together with precise adhesive techniques.
The next step is to assemble the arch’s support structure. This can involve interlocking joints, glue, or tape. Choose the method that best suits the size and complexity of your arch. Ensure the connections are secure, as they will bear the weight of the upper structure.
Finally, embellish your arch to match the architectural style of your paper creation. Consider adding decorative molding or faux stone cladding using paint or paper textures. With imagination and creativity, you can transform your paper arch into a focal point that adds depth and grandeur to your model.
So, embark on this architectural adventure, embrace the art of arch-making, and watch your paper creations soar to new heights of elegance and functionality.
Vaults: The Majestic Architecture of Paper
In the realm of 3D paper architecture, vaults stand as architectural prowess, captivating with their graceful curves and spacious interiors. These intricate structures, often used in religious or grand buildings, elevate a paper creation to the heights of awe-inspiring grandeur.
Building vaulted roofing requires patience, careful planning, and a keen eye for detail. Begin by understanding the basic principles of arch construction. Arches, the foundation of vaults, are created by curving paper strips or layering multiple arches together. As the arches intersect, they form the ribs or framework of the vault.
To create a vault, start by assembling parallel arches that define the shape and span of the structure. These arches act as the main supports and determine the height and width of the vault. Once the arches are in place, connect them with transverse arches, which run perpendicular to the main arches. These transverse arches provide additional support and create the distinct ribbed pattern characteristic of vaults.
The challenge lies in interlocking the arches precisely to maintain the structural integrity of the vault. Use glue or specialized adhesives to secure the joints, ensuring they are strong enough to withstand the weight of the paper.
As you construct the vault, pay attention to the balance and symmetry of the curves. This will enhance its aesthetic appeal and prevent the structure from collapsing due to uneven weight distribution. Additionally, consider reinforcing the vault with additional layers of paper or cardstock to increase its rigidity.
With patience and a steady hand, you can build breathtaking vaulted roofing structures that will add an element of grandeur and realism to your 3D paper architecture creations. Embark on this architectural adventure and elevate your paper models to the next level of sophistication.
Domes: Exploring the Majestic Realm of Paper Architecture
In the world of 3D paper architecture, domes stand as architectural wonders, showcasing the boundless possibilities of creativity. Constructing these paper masterpieces can be a challenging but incredibly rewarding endeavor, inviting you on an artistic journey to conquer both the challenges and reap the rewards.
The Challenge: A Delicate Dance of Structure and Support
Domes, with their curved surfaces and intricate designs, present a unique set of challenges. The curvature requires patience and precision in shaping the paper, while maintaining structural integrity is crucial to prevent the dome from collapsing under its own weight. Balancing these elements demands a keen eye for detail and an understanding of the mechanics of paper folding.
The Reward: Witnessing Structural Harmony in Motion
Yet, the challenges of constructing paper domes are outweighed by the immense satisfaction it brings. As you carefully assemble each piece, the dome gradually takes shape, transforming from a flat sheet of paper into a self-supporting architectural marvel. The harmony of the curves and the intricate detailing create a sense of awe and accomplishment that only comes from crafting something truly unique.
Techniques for Crafting Paper Domes
Several techniques can be employed to construct paper domes. Curved folds, interlocking pieces, and adhesion play vital roles in creating these architectural wonders. Mastering these techniques unlocks the ability to build domes of various shapes, sizes, and designs, allowing you to unleash your creativity and bring your vision to life.
Embracing the Journey of Paper Dome Construction
Embark on this adventure of paper dome construction with a spirit of exploration and experimentation. Embrace the challenges as opportunities for growth and refinement, and revel in the rewards of witnessing your architectural creation come to life. Whether it’s for decorative purposes, educational projects, or simply the joy of crafting, paper domes offer an immersive and enriching experience for all who dare to take on their construction.
Paper Tearing: Guide on avoiding tears with gentle handling and sharp tools.
The Frustrating Foe of Paper Tearing: A Gentle Reminder for Paper Architects
In the realm of 3D paper architecture, a torn paper can be like a sudden gust of wind that threatens to topple your meticulously crafted structure. If you’re a beginner, this can be a disheartening setback. But fret not, dear paper architect! With a dash of gentle handling and a trusty pair of sharp scissors, you can master the art of preserving paper’s integrity and safeguard your creations from untimely tears.
First and foremost, treat your paper with the utmost care and respect. Avoid overworking it or folding it too sharply. When handling delicate pieces, use a light touch to prevent accidental rips or tears. This gentle approach will ensure your paper remains pliable and cooperative, ready to be transformed into your masterpiece.
Next, the choice of scissors is paramount. A sharp pair of scissors will make clean cuts through the paper’s fibers, leaving a smooth edge that minimizes the risk of tearing. Avoid using dull scissors, as they tend to crush the paper, creating weak spots that are prone to breakage. Invest in a good pair of scissors and keep them well-maintained for optimal cutting performance.
With these simple tips in mind, you’ll be well-equipped to avoid paper tearing and bring your architectural visions to life on paper. Remember, patience and precision are key. So, handle your paper with care, use sharp scissors, and let your creativity soar without the fear of paper tears holding you back.
Weak Joints: Ensuring Sturdy Structures
When embarking on the captivating journey of 3D paper architecture, one potential pitfall that may arise is weak joints. However, fear not, dear readers, as there are ingenious techniques to reinforce these crucial connections, ensuring the integrity of your paper masterpiece.
Adhesives: The first line of defense against feeble joints lies in the judicious application of adhesives. Choose high-quality glues or tapes specifically designed for papercraft, as they create strong bonds that can withstand the rigors of construction and handling. Apply adhesives liberally and evenly, pressing down firmly to ensure a secure hold.
Reinforcement Layers: For joints that demand extra strength, consider adding reinforcement layers. Thin strips of paper, cardstock, or even fabric can be strategically placed over the joint and glued in place. These additional layers act as reinforcing beams, distributing stress and preventing the joint from tearing.
Remember, the key to sturdy joints is precise execution and attention to detail. Take your time with each joint, ensuring that the adhesive is applied correctly and the reinforcement layers are securely attached. With a little patience and care, your paper creation will stand tall and strong, a testament to your craftsmanship and architectural prowess.
Stability: The Bedrock of 3D Paper Architecture
In the enthralling realm of 3D paper architecture, stability reigns supreme. Just like a towering skyscraper, your paper masterpiece should stand tall and steady, unyielding to the capricious whims of gravity. Achieving this is not a mere feat of engineering; it’s an art form in itself.
The foundation of stability lies in a solid base. Think of it as the bedrock upon which your paper house will rest. Ensure that the base is wide and sturdy, providing ample support for the structure that will rise above it.
Supportive elements are the unsung heroes of stability. They act as hidden braces, reinforcing your paper edifice from within. These can include internal beams, cross-bracing, or even strategically placed pieces of cardboard. By distributing the weight evenly throughout the structure, these elements prevent it from buckling or leaning.
Remember, the key to stability is to create a harmonious balance between the weight of your paper house and its ability to withstand external forces. With meticulous planning and careful assembly, you can transform your humble sheets of paper into a testament to architectural stability that will endure the test of time.
Paints and Dyes: Adding Vibrancy and Personality to Your Paper House
In the realm of 3D paper architecture,色彩 plays a pivotal role in bringing your creation to life. Paint and dyes offer a myriad of possibilities to transform your paper house into a vibrant and captivating masterpiece.
Let your imagination soar as you explore the boundless shades of paint. Choose hues that complement your design, evoking a specific mood or ambiance. Whether it’s the soft glow of pastel hues for a dreamy abode or the bold statement of primary colors for a playful structure, paints empower you to infuse your paper house with its own unique character.
Dyes, with their more subtle and ethereal qualities, provide an alternative path to adding color. Dip your paper into a bath of dye to achieve a uniform, permeating coloration. Experiment with different techniques, such as immersion, sponging, or spraying, to create intricate patterns and subtle variations. The possibilities are endless, allowing you to customize your paper house to perfection.
Remember, the beauty of paint and dyes lies in their ability to transform the ordinary into the extraordinary. So, don’t be afraid to experiment, mix colors, and let your creativity guide you. Each brushstroke or drop of dye adds a touch of your personality, making your paper house a truly unique and unforgettable work of art.
Textures: Guide on enhancing realism by adding textures.
Textures: Bringing Your Paper Architecture to Life
In the realm of 3D paper architecture, adding textures is an art form that elevates your creations from mere structures to true masterpieces. By mimicking the tactile qualities of real-world materials, textures breathe life into your paper houses, making them tangible and immersive.
Embossing and Debossing: The Art of Subtlety
Embossing and debossing are techniques that create raised or indented surfaces on paper, respectively. Imagine adding subtle wrinkles to the walls of a paper cottage or creating the illusion of weathered stones on a miniature castle. The key to mastering these techniques lies in using a stylus or embossing tool and applying even pressure.
Scoring and Creasing: The Illusion of Depth
Scoring and creasing lend a three-dimensional quality to your paper architecture by simulating the folds and creases found in real buildings. By scoring along the lines of a paper roof, for example, you create a natural-looking bend that mimics the slope of a real roofline. Creasing, on the other hand, involves folding the paper along the scored lines, adding depth and realism to the structure.
Collaging: A Canvas of Textures
Collaging different paper materials offers endless possibilities for enhancing textures. Torn pieces of newspaper can create the weathered look of a crumbling wall, while patterned papers can add intricate details to facades and interiors. The key to successful collaging is careful selection of paper materials and precise cutting.
Painting and Glazing: A Touch of Color and Shine
Adding color to your paper architecture is a surefire way to make it pop. Watercolor, acrylics, or even markers can be used to create vibrant walls, patterned floors, or realistic roof tiles. Glazing, on the other hand, involves applying a thin layer of mod podge or resin to enhance the shine and durability of the finished product.
Decorative Elements: Explain customizing the creation with embellishments like windows, doors, and furniture.
Decorative Elements: Enhancing Realism and Personalization
As you reach the final stage of your 3D paper architecture journey, it’s time to breathe life into your creation with embellishments that elevate it from an ordinary structure to a masterpiece. Windows and Doors are the eyes and gateways of your paper house, inviting the world to peek inside and inspiring a sense of connection. Use precise cutting and delicate detailing to create realistic proportions and intricate frames.
Furniture transforms your paper house into a cozy abode. Craft miniature chairs, tables, beds, and lamps to furnish the interior and tell a story of the occupants’ lives. Curtains add a touch of elegance, framing the windows with flowing fabrics. Wallpaper or paint introduces color and pattern, creating a vibrant and inviting atmosphere.
Don’t shy away from experimenting with different materials to enhance realism. Use fabric scraps for curtains, cardboard for furniture, and paint or markers to bring your vision to life. Texture adds depth and dimension to your paper house. Embossed paper or sandpaper can simulate the rough texture of stone walls, while foil or glossy paper can create the illusion of metal or glass.
Every embellishment you add to your 3D paper house is a unique touch that reveals your creativity and artistry. Embrace the freedom to customize your creation, making it a reflection of your own imagination. Whether you choose to recreate famous architectural landmarks or design whimsical fantasy structures, your paper architecture will become a testament to your skill and passion.