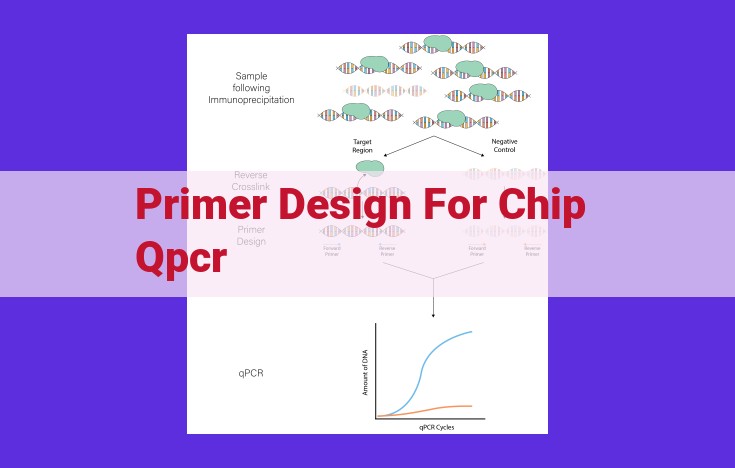
Optimize Chip Qpcr Primer Design For Enhanced Amplification Performance
Designing primers for chip qPCR requires optimizing parameters for: amplicon length (efficiency), primer specificity (sensitivity), Tm (annealing), GC content (specificity), dimer formation (avoidance), self-complementarity (binding), and secondary structure (avoidance). Optimization tools and experimental fine-tuning help refine primer design and PCR conditions for enhanced amplification performance.
Amplicon Length: The Balancing Act of PCR Efficiency and Detection
Imagine you’re a detective on a mission to gather information from a crime scene. The efficiency and accuracy of your investigation depend on the amplicon length, the specific region of DNA you’re targeting for analysis.
Optimizing Amplicon Length
In the world of chip qPCR, shorter amplicons (less than 150 base pairs) lead to faster amplification and higher efficiency. This is because shorter DNA fragments require fewer amplification cycles, reducing the risk of non-specific binding and primer-dimer formation.
However, longer amplicons (150-250 base pairs) improve detection sensitivity. Longer sequences allow for more specific primer binding, reducing the likelihood of false-positives. They also enable the detection of rare targets, especially when combined with fluorescence-based detection methods.
Finding the Ideal Amplicon Length
For chip qPCR platforms, the ideal amplicon length is between 100-150 base pairs. This range balances the need for fast amplification with reliable detection. However, specific requirements may vary depending on the target DNA, primer design, and qPCR system used.
By optimizing amplicon length, you can improve the efficiency and accuracy of your qPCR experiments, ensuring you gather the critical information needed to solve the DNA mystery.
Primer Specificity: Targeting the Right Region
Introduction:
Designing specific primers is crucial for successful real-time PCR (qPCR). Non-specific amplifications, caused by primers binding to unintended regions, can compromise data accuracy and lead to false positives. By understanding the importance of primer specificity and implementing effective design strategies, researchers can ensure they target the desired regions precisely, enhancing both specificity and sensitivity of their qPCR assays.
Importance of Primer Specificity:
* Avoiding Non-specific Amplification: Specific primers only bind to the target DNA sequence, preventing amplification of non-specific regions. This reduces background noise and improves signal-to-noise ratio, increasing the accuracy of qPCR results.
* Enhanced Sensitivity: Specific primers bind to their target with a high affinity, resulting in efficient amplification. This increased binding efficiency enhances the sensitivity of qPCR assays, allowing for the detection of even low-abundance targets.
Strategies for Designing Specific Primers:
* Sequence Analysis: Before designing primers, researchers should thoroughly analyze the target DNA sequence to identify regions that are unique and specific for the intended target. This can be done using online databases and software tools.
* Primer Length and Melting Temperature (Tm): Primers should be designed with an optimal length to ensure efficient binding and stability. The Tm of the primers should be carefully considered to ensure specific annealing to the target sequence.
* GC Content: The GC content of primers influences their Tm and binding affinity. Primers with a balanced GC content promote optimal annealing and minimize non-specific interactions.
* Self-Complementarity and Secondary Structures: Primers should be designed to minimize self-complementarity and secondary structures, such as hairpins and dimers. These structural issues can prevent efficient annealing and lead to non-specific amplification.
Conclusion:
Primer specificity is paramount for successful qPCR assays. By understanding the importance of primer specificity and implementing effective design strategies, researchers can ensure that their primers target the desired region precisely. This results in accurate and sensitive qPCR results, enabling researchers to obtain reliable and meaningful data from their experiments.
Primer Melting Temperature: The Key to Efficient and Specific PCR
In the intricate world of polymerase chain reaction (PCR), the temperature at which primers melt, known as primer melting temperature (Tm), plays a pivotal role in determining the efficiency and specificity of amplification. Primer Tm is the temperature at which half of the primer molecules are annealed to their complementary sequences.
To ensure optimal annealing efficiency, the annealing temperature during PCR should be approximately 5°C below the Tm of the primers. This delicate balance allows the primers to bind to their target sequences with high affinity while preventing non-specific interactions.
If the annealing temperature is too low, the primers may not bind efficiently, resulting in a reduction in amplification yield. Conversely, if the temperature is too high, non-specific annealing may occur, leading to unwanted amplification of non-target sequences.
Optimizing primer Tm is crucial for achieving specific and sensitive PCR. By carefully selecting primers with appropriate Tm values and adjusting the annealing temperature accordingly, researchers can enhance the efficiency and reliability of their PCR experiments.
GC Content: The Balancing Act of Primer Specificity and Annealing
When designing primers for qPCR, GC content plays a crucial role in determining their effectiveness. It influences both the primer’s melting temperature (Tm) and its annealing behavior.
Tm is the temperature at which half of the amplicon is double-stranded and half is single-stranded. As GC content increases, so does Tm. This is because GC base pairs form three hydrogen bonds, while AT base pairs form only two. Therefore, a primer with high GC content will have a higher Tm and require a higher annealing temperature.
Annealing is the process of primer binding to the target DNA. The GC content of the primer affects the strength of this binding. Primers with high GC content form more stable bonds with the target DNA, resulting in a stronger and more specific annealing. However, primers with too high GC content may have non-specific binding, which can lead to false positives.
To optimize primer performance, it is important to find the right balance of GC content. A primer with a moderate GC content (40-60%) is typically recommended. This range allows for strong and specific annealing while minimizing non-specific interactions.
Guidelines for Optimizing GC Content:
- Aim for a GC content of 40-60%.
- Consider the Tm of the primer and the annealing temperature of the PCR reaction.
- Avoid primers with long stretches of consecutive Gs or Cs, which can promote secondary structure formation and reduce annealing efficiency.
- Use software tools or databases to calculate the GC content and Tm of your primers before ordering them.
By carefully considering the GC content of your primers, you can enhance their specificity and annealing behavior, leading to more accurate and reliable qPCR results.
Primer Dimer Formation: The Unwanted Guest at Your qPCR Party
In the realm of qPCR, we seek perfection—precise amplification, accurate quantification, and reliable results. However, an unwelcome guest often crashes the party: primer dimers. These pesky molecules form when primers, instead of binding to their intended target DNA, bond with each other. The result? False amplification signals and compromised assay results.
The Trouble with Dimers
Primer dimers are not just an annoyance; they can have serious consequences for qPCR. They compete with the real target DNA for primers and reagents, reducing amplification efficiency. This decreases sensitivity and can lead to false negatives. Moreover, dimers can interfere with data analysis, creating artificial peaks that mimic target amplification.
Strategies for Evading Dimers
To keep primer dimers at bay, strategic primer design is crucial. Here are a few tips:
- Design primers with different melting temperatures (Tm): A difference of at least 10°C in Tm helps prevent primer-primer interactions.
- Avoid complementary sequences within primers: This minimizes the chance of intramolecular binding and dimer formation.
- Use software tools: Specialized software can analyze primer sequences and identify potential dimer-forming regions.
Optimizing PCR Conditions
In addition to primer design, PCR conditions can also influence dimer formation. These parameters are worth fine-tuning:
- Magnesium concentration: High magnesium levels promote primer binding and can increase dimer formation. Reducing magnesium concentration can help curb dimers.
- Annealing temperature: A higher annealing temperature favors specific primer binding to the target DNA, reducing the chance of dimer formation.
- Primer concentration: Using a low concentration of primers (0.1-0.3 μM) limits the availability for dimerization.
Experimental Optimization
Even with carefully designed primers and optimized PCR conditions, primer dimers can still occasionally appear. If you suspect they’re causing trouble, try these troubleshooting steps:
- Gradient PCR: Perform PCR across a range of annealing temperatures to find the optimal temperature that minimizes dimers.
- Touchdown PCR: Start with a high annealing temperature and gradually decrease it as the reaction progresses. This helps prevent early primer dimer formation.
- Post-PCR melting curve analysis: This technique can distinguish between target amplification and primer dimers based on their different melting profiles.
By following these guidelines and employing experimental optimization techniques, you can minimize the formation of primer dimers, ensuring reliable and accurate qPCR results. With these uninvited guests kept at bay, your qPCR party will be a roaring success!
Self-Complementarity: Preventing Intramolecular Hybridization
- Discuss the concept of self-complementarity and its potential to inhibit primer binding.
- Provide guidelines for designing primers with minimal self-complementarity.
- Explain how to identify and avoid primers with problematic self-complementary sequences.
Self-Complementarity: Steering Clear of Primer Misadventures
When embarking on a PCR journey, we often focus on optimizing amplicon length, primer specificity, and temperature. However, there’s another crucial aspect that can trip us up: self-complementarity. This insidious phenomenon occurs when a primer can bind to itself instead of the target DNA. Think of it as a primer with an identity crisis, trying to be both a detective and the suspect it’s supposed to find!
Self-complementarity can lead to a nasty side effect called primer dimers, which are double-stranded DNA fragments formed by the self-annealing of primers. These rogue molecules compete with the intended amplicon for reagents and amplification, reducing sensitivity and specificity. It’s like having uninvited guests crashing a party, stealing the spotlight from the real stars.
To prevent this primer self-love, we need to design primers with minimal self-complementarity. Imagine primers as jigsaw puzzle pieces. Each piece has a specific shape that fits into the target DNA sequence. But if the pieces also fit together, they’ll get stuck in their own puzzle-within-a-puzzle and forget their duty.
To avoid this confusion, follow these guidelines:
- Check for internal repeats: Use software tools like Primer3 or BLAST to identify regions of self-complementarity within the primer. If they exceed 4 consecutive base pairs, consider redesigning the primer.
- Avoid palindromic sequences: Palindromes are sequences that read the same backwards and forwards. These sneaky little sequences can bind to themselves like mirror images, creating a self-referential DNA drama.
- Limit 3′-end complementarity: The 3′ end of a primer is particularly prone to self-complementarity. Keep it short (around 6-8 bases) and avoid sequences that can form stable double strands.
Remember, primer design is a delicate art. By understanding the pitfalls of self-complementarity, we can craft primers that are both specific and efficient, ensuring that our PCR experiments reach their maximum potential. May your primers dance harmoniously with the target DNA, leaving no room for self-indulgent diversions.
Secondary Structure Formation: Avoiding Structural Hindrances
When designing PCR primers, it’s crucial to consider the potential for secondary structure formation. These are unwanted structures that can form within the primer sequences, interfering with primer binding and amplification.
How Secondary Structures Interfere
Hairpins and dimers are common secondary structures that can arise when primers have complementary sequences within themselves. These structures prevent primers from annealing properly to their target DNA, reducing amplification efficiency and potentially leading to false results.
Strategies for Minimizing Secondary Structures
To minimize secondary structure formation, consider the following strategies:
- Avoid primer sequences with extensive complementary regions. Check for long stretches of identical nucleotides that could lead to hairpin formation.
- Use degenerate bases. Incorporating inosine (I) or other degenerate bases can break up complementary regions, reducing the likelihood of secondary structures.
- Design primers with optimal GC content. GC-rich regions promote stable secondary structures, while AT-rich regions are less likely to form them. Aim for a balanced GC content of around 40-60%.
- Utilize free software tools. Various programs can predict and analyze primer secondary structures. Use these tools to identify potential problem areas and optimize primer design.
By following these guidelines, you can design primers with minimal propensity for secondary structure formation, ensuring efficient and accurate PCR amplifications.
Optimizing Primer Design and PCR Conditions
Once you’ve followed the guidelines for primer design, it’s time to refine your approach for even better results. Leveraging advanced tools and techniques can significantly enhance the efficiency and specificity of your PCR reactions.
Harnessing Software and Databases
Numerous software tools and databases are your allies in optimizing primer design. These resources analyze your target sequences and propose primer pairs with optimal melting temperatures, GC content, and minimal secondary structures. By utilizing these tools, you can save valuable time and increase the likelihood of designing effective primers.
Fine-tuning PCR Conditions
Beyond primer design, optimizing PCR conditions is crucial. Magnesium concentration and annealing temperature are key parameters to adjust. Slight variations can significantly impact amplification efficiency. For example, higher magnesium concentrations stabilize primer-template interactions, improving specificity. Similarly, adjusting the annealing temperature ensures optimal primer binding and minimizes non-specific amplification.
Experimental Optimization: The Path to Success
Experimental optimization is the ultimate test of your primer design and PCR conditions. Run a series of reactions with varying conditions to determine the best combination for your specific target and assay. Through this iterative process, you can fine-tune parameters such as primer concentration, cycling conditions, and even the presence of additives.
By implementing these optimization strategies, you empower yourself to design primers and optimize PCR conditions that deliver sensitive, specific, and reproducible results. Embrace these techniques to unlock the full potential of your qPCR experiments.