How To Replace A Serpentine Belt Tensioner Pulley: A Step-By-Step Guide
- Safety first: Wear safety glasses, disconnect battery, cool engine. 2. Gather tools: Box-end wrench or socket. 3. Identify tensioner pulley: Locate nut and bolt securing it. 4. Release tension: Loosen pulley set screw, use tensioner wrench to release belt tension. 5. Remove bolt: Unscrew nut and bolt with appropriate wrench/socket. 6. Check clearance: Ensure tool access and sufficient space to remove pulley. 7. Verify belt routing: Refer to vehicle diagram for accurate belt installation. 8. Reinstall: Install new pulley, torque bolt, tighten set screw, reconnect battery.
Safety First: Paramount Precaution for Tensioner Pulley Replacement
Embarking on the task of replacing your tensioner pulley requires utmost caution. Prioritizing safety ensures a risk-free and smooth process.
- Goggles On: Protect your eyes from any flying debris or fluids.
- Battery Disconnect: Prevention is better than cure. Disconnect the battery to eliminate any electrical hazards.
- Engine Cool-Down: Give your engine ample time to cool down before starting to work on it.
Gather Your Tools: A Journey into the World of Belt Tensioners
Step into the automotive realm, where maintaining your car’s engine performance is crucial. One essential component that plays a vital role in keeping everything running smoothly is the serpentine belt tensioner. With a few basic tools and some elbow grease, you can conquer the task of replacing it yourself and avoid costly garage expenses.
Now, let’s dive into what you’ll need for this adventure. Fear not, specialized tools aren’t necessary. The key is to have a reliable box-end wrench or socket that fits the size of the tensioner pulley bolt. These tools will serve as your trusty companions, providing the leverage you need to tackle this task.
The first step is to locate the tensioner pulley, usually found near the engine’s front. Once you’ve spotted it, it’s time to prepare the wrench or socket for the tensioner bolt. This is where precision matters, so make sure the socket or wrench fits snugly to avoid any slipping.
With your tools ready, you’re all set to embark on the quest to replace the serpentine belt tensioner. Let the journey begin!
Identifying the Tensioner Pulley: A Step-by-Step Guide
When it comes to replacing a serpentine belt, knowing how to locate and remove the tensioner pulley is crucial. Follow these clear instructions to navigate this task without any hassle:
1. Locate the Serpentine Belt:
- Pop your hood and identify the serpentine belt. It’s the long, looping belt that runs around the engine accessories.
2. Follow the Belt to the Tensioner:
- Trace the serpentine belt until you reach a pulley that has a spring or hydraulic mechanism attached to it. This is the tensioner pulley.
3. Inspect the Tensioner Pulley:
- Look for the nut and bolt that secure the tensioner pulley in place. These are usually located on the side or back of the pulley.
4. Note the Pulley’s Orientation:
- Pay attention to the orientation of the tensioner pulley. This will help you determine how to release the tension.
5. Consult the Service Manual for Specifics:
- Refer to the vehicle’s service manual for precise information on the location and type of tensioner pulley in your vehicle.
Determining Bolt Torque: A Crucial Step in Tensioner Pulley Replacement
As we embark on the journey of replacing a tensioner pulley, one critical aspect we cannot overlook is determining the bolt torque. Tightening the bolt to its manufacturer-specified torque is paramount to ensure proper tensioner operation and prevent costly engine damage.
This is where your vehicle’s service manual becomes an indispensable tool. It contains the specific torque values for the bolt based on its size, grade, and head type. Consulting the manual is essential for determining the exact torque required for your particular vehicle and component.
Do not be tempted to guess or rely on generic torque recommendations. Using an incorrect torque can either under or over-tighten the bolt, compromising the tensioner’s ability to maintain proper belt tension. In the former case, the belt may slip, leading to performance issues or even engine damage. Conversely, over-tightening can cause the bolt or tensioner to fail, resulting in a potentially catastrophic loss of belt tension.
Therefore, take the time to locate the correct torque specification in your vehicle’s service manual. It is a simple yet crucial step that will ensure your tensioner pulley replacement is successful and your engine remains in optimal condition.
Releasing Tension: A Crucial Step in Tensioner Pulley Replacement
Replacing your car’s tensioner pulley may seem daunting, but releasing the tension from the belt is a crucial step that’s easier than you think.
Loosening the Pulley Set Screw
Locate the set screw that holds the pulley in place. Using a wrench or hex key, carefully loosen the screw but do not remove it completely. This will allow you to pivot the pulley.
Using a Tensioner Wrench or Lever
Now comes the magic. Insert a tensioner wrench or lever into the designated hole on the tensioner pulley. By applying pressure on the wrench, you can rotate the pulley clockwise to release the tension from the belt. Be gentle and avoid applying excessive force.
Monitor the Belt’s Movement
As you release tension, the belt should begin to loosen and move away from the tensioner pulley. Continue rotating the wrench until the belt is loose enough to remove. Do not overextend the belt’s flexibility, as this can damage it.
Caution: Release Tension Carefully
Remember, the belt is under significant tension, so release it gradually to avoid injury. Always wear safety glasses and gloves, and secure the tool firmly to prevent it from slipping.
Preparing for Pulley Removal
Once the tension is released, the belt should be loose enough to remove the tensioner pulley. Before proceeding, double-check the belt’s clearance and your tool’s accessibility. You need to ensure there’s enough space to safely remove the pulley and replace it with the new one.
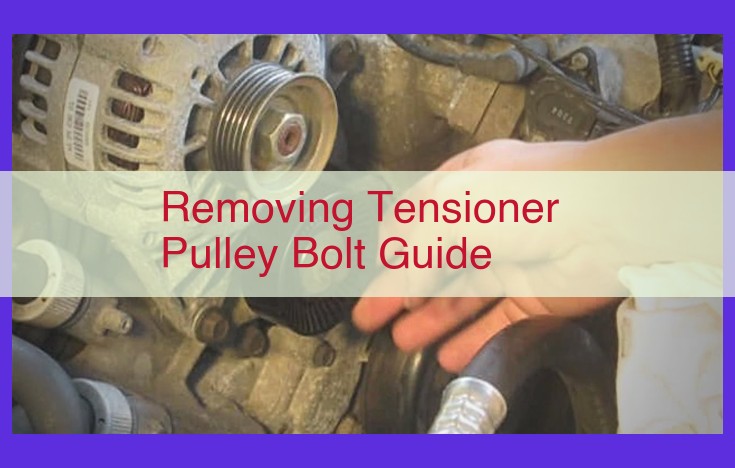
Removing the Bolt:
- Instruct readers on using a box-end wrench or socket to safely remove the nut and bolt.
Step 6: Removing the Bolt
As you prepare to detach the tensioner pulley, it’s crucial to ensure a safe and efficient process. Reach for your trusty box-end wrench or socket, the lifeline to releasing the pulley from its snug hold.
With precision, position the tool over the nut or bolt securing the tensioner pulley. Apply gentle pressure and slowly begin to unscrew, keeping a steady hand throughout. Remember, patience is key to avoid any mishaps or potential damage.
As the nut or bolt loosens, you’ll feel a gradual release in tension. Continue turning the wrench or socket until the bolt is completely free and can be easily removed by hand. By following these steps carefully, you’ll safely remove the bolt and pave the way for the next step in your tensioner pulley replacement journey.
Ensuring Ample Clearance and Tool Accessibility for Tensioner Pulley Removal
Before embarking on the task of removing the tensioner pulley, it’s imperative to assess the surrounding space thoroughly. Ensuring sufficient clearance is crucial to prevent any hindrance during the process and to maintain safety.
Inspect the area around the tensioner pulley, particularly the access points for tools. Consider the angle at which you’ll need to approach the pulley and whether there are any obstacles that may interfere. It’s advisable to create some extra room by removing surrounding components if possible.
Adequate tool access is equally important. Choose wrenches or sockets that fit snugly onto the nuts and bolts without any slippage. Confirm that the handles have enough space to be turned comfortably without bumping into nearby objects.
By taking the time to verify clearance and tool accessibility, you’ll minimize the risk of frustration, injuries, or damage to components. This preparation will lay the foundation for a smooth and successful tensioner pulley removal process.
Verifying Belt Routing: A Crucial Step for Accurate Installation
Ensuring proper belt routing is paramount for the smooth operation of your vehicle’s serpentine belt system. The belt’s path must meticulously align with all pulleys and components it engages. Referencing the vehicle’s specific belt routing diagram is essential to achieve this precision.
The belt routing diagram, typically located in the engine compartment or owner’s manual, provides a detailed illustration of the belt’s path. It indicates the exact order in which the belt should wrap around pulleys, idlers, and tensioners. By following this diagram closely, you can avoid misalignment and ensure optimal performance.
Proper belt routing minimizes premature wear and tear, reduces noise, and prevents slipping, which can lead to power loss and potential engine damage. Misalignment can also create excessive stress on the belt and its components, shortening their lifespan. Therefore, taking the time to double-check the belt’s path against the routing diagram is imperative.
Remember, a properly routed serpentine belt is a key contributor to the smooth, efficient operation of your vehicle. By following the belt routing diagram religiously, you can avoid costly repairs and ensure a trouble-free driving experience.
Reinstallation and Finalization: Putting It All Back Together
After successfully removing the old tensioner pulley, it’s time to install the new one and complete the belt replacement process.
Locate the new pulley and place it back onto the bracket, aligning it with the belt path and the mounting bolt hole. Hand-tighten the nut onto the bolt, securing the pulley in place but leave it slightly loose for now.
Now, it’s crucial to verify the belt routing by consulting your vehicle’s belt routing diagram. This will ensure that the belt is installed correctly on all pulleys. Position the belt over the pulleys, making sure it is properly aligned and seated in the grooves. Once you’re satisfied with the belt routing, it’s time to tighten the tensioner pulley bolt.
Using a torque wrench, carefully tighten the nut to the specified torque value as indicated in your vehicle’s service manual. This is essential to ensure that the belt is properly tensioned and the pulley is securely fastened.
Don’t forget to tighten the set screw on the tensioner pulley to lock it in place. Use a small Allen key or hex wrench to snug the set screw, but avoid overtightening.
Finally, reconnect the negative battery terminal to restore power to your vehicle. Start the engine and visually inspect the belt to ensure it is running smoothly and without any unusual noises or vibrations.
Congratulations! You have successfully replaced the serpentine belt tensioner pulley and restored your vehicle’s charging system. Take pride in your accomplishment and enjoy the satisfaction of a well-maintained car.