Advanced Guide To Installing Windows In A Pole Barn: Step-By-Step Instructions For Building Success
Installing windows in a pole barn requires precise planning and construction. Site preparation includes clearing, grading, and drainage. Pole selection and placement ensure stability, while framing involves durable materials and secure joinery. Sheathing, insulation, and vapor barriers provide support, energy efficiency, and moisture protection. Siding and trim enhance aesthetics and protection. Roofing protects against elements and allows proper ventilation. Windows, doors, and hardware provide functionality and security. Electrical wiring ensures safety and convenience, while plumbing (if required) adds convenience. Finishing touches, such as paint and hardware, complete the project with style and functionality.
The Ultimate Guide to Installing Windows in a Pole Barn: Part 1 – Site Preparation
Embarking on a pole barn construction journey? Installing windows is a crucial step to enhance natural lighting and ventilation within your barn. But before you jump into the window installation process, meticulous site preparation is paramount to ensure a successful and durable structure.
Land Clearing: A Blank Canvas for Your Pole Barn
The first step in site preparation involves land clearing, transforming the designated location into a clean slate for your barn. This may involve removing obstacles such as trees, rocks, or debris that could hinder the construction process. Once these impediments are cleared, you’ll have a pristine canvas to begin laying the foundation for your pole barn.
Grading: Ensuring Proper Drainage
Grading is essential for directing water away from your barn, preventing costly water damage. This process involves leveling the ground to achieve proper drainage and water diversion. By creating a slight slope away from the barn, you can ensure that rainwater flows away from the structure, protecting it from water pooling and potential foundation issues.
Drainage: Keeping Water at Bay
To further enhance drainage, consider installing underground drains or trenches. These drainage systems will effectively channel water away from the barn’s foundation, preventing moisture buildup that could lead to structural damage or mold growth. By implementing these drainage measures, you’ll create a stable and dry environment for your pole barn, ensuring its longevity and minimizing future maintenance headaches.
Grading: Preparing the Foundation for a Level and Dry Pole Barn
As you embark on the exciting journey of constructing a pole barn, proper site preparation is crucial for its longevity and functionality. One essential aspect of site preparation is grading, which plays a pivotal role in ensuring proper drainage and preventing water damage to your cherished barn.
Grading involves leveling the ground to create a uniform slope that directs water away from the barn. This strategic slope ensures that heavy rainfall or melting snow doesn’t accumulate around the barn’s perimeter, which can lead to costly foundation issues and structural damage.
When grading your pole barn site, consider these key steps:
- Assess the existing slope: Determine the natural slope of the land and plan the grading accordingly.
- Establish a primary drainage point: Identify the lowest point in the surrounding area where water can naturally drain away from the barn.
- Create a slope toward the drainage point: Using a grading tool or bulldozer, gradually slope the ground from the barn’s perimeter towards the drainage point. The slope should be gentle enough to allow water to drain freely but not so steep that it creates erosion.
By carefully grading your pole barn site, you not only protect your barn from the perils of water damage but also enhance its overall functionality. A well-drained barn stays dry, preventing mildew, rot, and other moisture-related issues. It also provides a stable and level surface for constructing the barn and installing its fixtures. So, take the time to properly grade your site and lay the foundation for a durable and trouble-free pole barn.
Drainage: Preventing Water Woes in Your Pole Barn
When constructing a pole barn, ensuring proper drainage is crucial to safeguard your investment from water damage and maintain a dry, habitable space. Water pooling around your barn can lead to structural issues, mold growth, and uncomfortable conditions. Therefore, implementing effective drainage solutions is paramount.
Subsurface Drains:
Installing underground drains is an excellent method for diverting water away from your pole barn. These drains are typically made of perforated pipes buried below the ground, collecting excess water and directing it to a suitable discharge point. By placing drains strategically around the perimeter of your barn and in areas prone to water accumulation, you can effectively intercept and channel water away from the foundation and walls.
French Drains:
If your site has consistently poor drainage, consider installing French drains. These drains consist of gravel-filled trenches wrapped in filter fabric. As water seeps into the gravel, it is filtered and drained away through the fabric, preventing it from saturating the ground around your barn. French drains are particularly useful for areas with high groundwater levels or heavy rainfall.
Surface Grading:
Proper surface grading plays a vital role in drainage. By sloping the ground away from your barn, you encourage water to flow naturally and prevent it from pooling. Ensure that the ground slopes at a minimum grade of 2% to ensure adequate drainage. This simple yet effective measure can significantly reduce the risk of water damage and create a drier, more comfortable environment in your pole barn.
Choosing the Right Poles for Your Pole Barn Windows
When it comes to building a pole barn with windows, the choice of poles is crucial for ensuring the longevity and stability of your structure. Durable poles that can withstand the elements and resist pests are essential for supporting the weight of window frames and ensuring proper insulation.
Pole Materials and their Benefits
The most common materials used for pole barn poles are:
-
Steel: Steel poles are highly durable, resistant to rot and insects, and can withstand heavy loads. They are also easy to work with and can be quickly installed.
-
Treated Lumber: Treated lumber is another popular option for pole barn poles. It is pressure-treated with chemicals that make it resistant to rot, decay, and insects. Treated lumber is more affordable than steel but may require more maintenance over time.
-
Concrete: Concrete poles are extremely durable and can support very heavy loads. They are also fireproof and resistant to pests. However, concrete poles can be more expensive than other options and require specialized equipment for installation.
Selecting the Right Poles for Your Needs
The best way to choose the right poles for your pole barn is to consider your specific needs. Here are a few factors to keep in mind:
-
Climate: Consider the climate in your area. Poles that are resistant to moisture and wind are essential in areas with harsh weather conditions.
-
Size and Weight: Determine the size and weight of the windows you plan to install. The poles you choose must be strong enough to support the weight of the windows and any additional framing or insulation.
-
Spacing: Spacing is also crucial. Poles should be spaced close enough together to provide adequate support for the window framing. However, they should not be too close together, as this can restrict airflow and make it difficult to install insulation.
By considering these factors, you can choose durable poles that will provide a solid foundation for your pole barn windows and ensure the longevity of your structure.
Pole Spacing: A Crucial Decision for Flawless Window Framing
When planning your windows in a pole barn, it’s essential to carefully determine the optimal pole spacing. This fundamental decision sets the stage for robust and enduring window framing, ensuring seamless installation and trouble-free functionality for years to come.
The ideal pole spacing is determined by two primary factors: the size of your windows and the load-bearing requirements of your pole barn’s structure. Larger windows naturally require more support, necessitating closer pole spacing. Similarly, the anticipated wind and snow loads in your area influence the spacing for adequate structural integrity.
To achieve a harmonious balance, consulting a professional engineer or building contractor is highly recommended. They possess the expertise to calculate the precise pole spacing based on your specific project requirements, ensuring safe and secure window installations.
Remember, proper pole spacing is not simply about aesthetics but about ensuring the seamless integration of your windows into the pole barn’s structure. It prevents bowing, sagging, or other structural issues that can compromise the integrity and lifespan of your building and windows.
By carefully considering the factors outlined above, you can determine the ideal pole spacing for your window framing, setting the foundation for a durable and aesthetically pleasing pole barn that will serve you well for decades to come.
Installing Windows in a Pole Barn: A Comprehensive Guide
For those aspiring to add windows to their pole barns, this article provides an in-depth guide to ensure a successful installation.
Pole Selection and Placement: Foundation of Stability
The foundation of your window installation lies in the proper selection and placement of poles. Choose durable materials like steel, treated lumber, or concrete to ensure resistance to rot and insects. Determine the optimal pole spacing based on the window framing you intend to use. To guarantee stability, bury the poles at least one-third of their height. This depth ensures the poles remain firmly planted against the elements. Whether you’re building a workshop, storage space, or recreational area, a well-supported structure is paramount.
Framing the Window: Crafting the Aperture
Once the poles are securely in place, it’s time to construct the frame for your window. Use pressure-treated lumber or metal studs to provide sufficient strength and durability. Carefully join the framing components using nails, screws, or bolts, ensuring a tight and secure connection to prevent any movement. This framework will form the opening for your future window, so precision is key.
Framing the Walls for a Sturdy Pole Barn
As you embark on the exciting journey of constructing your pole barn, the next crucial step after selecting and placing your poles is framing the walls. This framework will provide the structural support for your building, ensuring its strength and stability.
Materials for Endurance and Durability
The choice of framing materials is paramount for the longevity of your pole barn. Pressure-treated lumber stands out as an excellent option due to its exceptional resistance to rot and decay, making it ideal for outdoor structures exposed to the elements.
For added strength and durability, metal studs are also a viable choice. Their lightweight yet robust nature makes them a great candidate for pole barn framing, especially in areas prone to high winds or seismic activity.
Secure and Precise Joining Techniques
Once you have selected your framing materials, it’s time to assemble the walls. Nails, screws, or bolts can be used to securely fasten the framing components together, depending on your preference and the materials you’re using.
Proper joining techniques are crucial to prevent movement and ensure the structural integrity of your pole barn. Pay meticulous attention to the alignment and spacing of your framing members, using a level and square to ensure accuracy.
Expert Tips for a Successful Frame
- Use heavy-duty fasteners for increased stability, particularly at corners and load-bearing points.
- Consider reinforcements with bracing to resist lateral forces and prevent buckling.
- Ensure that the framing is plumb and level before sheathing the walls to avoid alignment issues down the line.
By following these guidelines, you’ll create a solid framework that will provide a strong foundation for your pole barn, giving you peace of mind for years to come.
Joinery Techniques: Ensuring Structural Stability
In the realm of pole barn construction, the solidity of the frame is paramount to the longevity and integrity of the structure. The joiner masterfully unites the frame’s components, employing various techniques to guarantee a robust and unwavering foundation for your pole barn.
Amongst the arsenal of techniques at the joiner’s disposal lie nails, screws, and bolts: each a stalwart ally in the battle against structural movement. Nails, with their penetrating prowess, excel in securing framing components in place. Screws, with their twisting grip, provide a more secure hold against the forces of nature. Bolts, the heavyweights of the trio, boast unparalleled strength and rigidity, ensuring an unyielding framework.
The choice of technique is dictated by the specific demands of the project. For instance, if the pole barn is intended for agricultural purposes, where heavy machinery may exert considerable forces, bolts would be the ideal choice. Conversely, for a storage pole barn where weight distribution is less demanding, nails or screws may suffice.
Proper application of these techniques is crucial. Nails must be driven at an angle to prevent the wood from splitting. Screws must be threaded with precision to ensure a tight grip. Bolts must be torqued to manufacturer’s specifications to achieve optimum holding power.
By employing the appropriate joinery techniques, meticulously selected for the specific needs of the pole barn, you can rest assured that your structure will stand firm and resolute against the test of time.
Essential Guide to Sheathing Your Pole Barn for Strength and Protection
When embarking on the rewarding journey of constructing your own pole barn, understanding the importance and types of sheathing is crucial. Sheathing, the layer installed over the framing of your walls and roof, provides structural support, acts as a base for siding, and protects your barn from the elements.
Selecting the Right Sheathing Material
The three most common sheathing materials for pole barns are:
-
Oriented Strand Board (OSB): An economical choice made from wood strands pressed together with resin.
-
Plywood: A stronger and more durable option, made from thin layers of wood glued together.
-
Fiber Cement: A non-combustible and weather-resistant material made from cement, sand, and cellulose fibers.
The type of sheathing you choose will depend on your budget, the required strength for your barn, and your local climate conditions.
Installing Sheathing for Maximum Strength
When installing sheathing, pay meticulous attention to the following steps:
-
Securely fasten: Use roofing nails or screws to attach the sheathing to the framing. Spacing between fasteners should be according to manufacturer’s specifications.
-
Stagger joints: Overlap adjacent panels by a minimum of six inches to prevent gaps and increase strength.
-
Use sheathing tape: Apply self-adhesive tape along the edges of the sheathing to seal joints and prevent water intrusion.
-
Install corner bracing: Add diagonal bracing to the corners of the structure to enhance stability and resist wind loads.
By following these guidelines, you’ll ensure that your pole barn’s sheathing provides the necessary support and protection for years to come.
Insulation Materials: Achieving Energy Efficiency and Year-Round Comfort
When it comes to creating a comfortable and efficient environment in your pole barn, insulation plays a pivotal role. By effectively trapping warm air during winter and keeping cool air inside during summer, proper insulation can significantly reduce energy consumption and lower your utility bills.
There are three main types of insulation commonly used in pole barns:
Fiberglass Insulation:
- Popular choice for its cost-effectiveness and ease of installation
- Made from fine glass fibers arranged in a mat or loose-fill form
- Offers excellent thermal resistance and soundproofing capabilities
Cellulose Insulation:
- Contains recycled paper, providing environmental benefits
- Naturally fire-resistant and treated with borate to prevent rodents and insects
- Can be challenging to install, so it’s often installed by professionals
Spray Foam Insulation:
- Premium option that creates a seamless barrier against air and moisture infiltration
- Excellent thermal resistance and soundproofing qualities
- Can be tricky to apply yourself and may require professional installation
Deciding the Right Insulation for Your Pole Barn
The best insulation choice for you depends on your budget, intended use, and climate.
- Fiberglass: Best for budget-conscious projects or large-scale coverage
- Cellulose: Eco-friendly option suitable for areas prone to mold or pests
- Spray Foam: Ideal for maximum energy efficiency and soundproofing in extreme climates
Tips for Effective Insulation Installation
- Fill cavities fully, leaving no uninsulated gaps
- Use appropriate vapor barriers to prevent condensation
- Install insulation perpendicular to studs or joists to maximize coverage
- Seal any openings, such as around pipes or wires
By investing in proper insulation, you can create a more comfortable and energy-efficient pole barn that you’ll enjoy for years to come.
Guard Against Moisture Intrusion: The Essential Role of Vapor Barriers
In the comforting embrace of your pole barn, where functionality seamlessly blends with aesthetics, an unseen threat lurks that could compromise its integrity: moisture. Moisture accumulation, a relentless foe, has the power to weaken structures, degrade materials, and create a breeding ground for mold and mildew. But fear not, for the unsung hero in this battle is the humble vapor barrier.
Picture a vapor barrier as an invisible guardian, standing steadfastly at the forefront of your pole barn’s defense against moisture. Its primary mission is to obstruct the insidious journey of water vapor, a sneaky intruder that finds its way through even the smallest gaps and cracks. This water vapor, when unchecked, can condense and wreak havoc on your precious building.
By installing a vapor barrier, you create a physical barrier that prevents warm, moisture-laden air from infiltrating the cooler areas of your pole barn. It acts as a safeguard, effectively trapping moisture within the warmer space, where it can be safely released without causing damage. The result? A dry, comfortable, and long-lasting pole barn that stands resilient against the elements.
The choice of vapor barrier material is crucial to its effectiveness. Polyethylene sheeting, widely used for its affordability and durability, is a popular option. Its thin, flexible nature allows it to conform to the contours of your pole barn’s structure, sealing even the most intricate nooks and crannies.
Butyl rubber barriers offer superior moisture resistance, making them an excellent choice for areas with high humidity or moisture levels. Their self-adhesive properties simplify installation, ensuring a tight seal against all surfaces.
Regardless of the material you choose, the key to effective vapor barrier installation lies in meticulous execution. Every seam and joint must be meticulously sealed with tape or caulk to prevent any moisture from sneaking through. Pay special attention to areas where the vapor barrier meets windows, doors, and other openings, as these are potential weak points.
By meticulously installing a vapor barrier, you are not only protecting your pole barn from moisture damage but also safeguarding your investment. With a vapor barrier in place, you can rest assured that your pole barn will remain a cozy and functional sanctuary for years to come.
Selecting the Perfect Siding for Your Pole Barn: A Tale of Durability, Cost, and Aesthetics
When it comes to cladding your pole barn, choosing the right siding is crucial for both functionality and aesthetics. With a wide range of options available, it’s essential to consider the unique needs of your barn and its surroundings.
Vinyl: The Durable and Cost-Effective Choice
Vinyl siding is a popular choice for pole barns due to its durability and affordability. It’s resistant to moisture, rot, and insects, ensuring a long-lasting exterior. Vinyl comes in a variety of colors and textures, allowing you to match it to your desired design.
Metal: The Strong and Low-Maintenance Option
Metal siding is an excellent choice for those seeking a strong and low-maintenance exterior. It’s highly resistant to fire, wind, and hail, providing exceptional protection for your barn. Metal siding is available in various finishes, including painted, galvanized, and corrugated, offering a wide range of aesthetic options.
Wood: The Classic and Aesthetically Pleasing Material
Wood siding adds a classic and rustic touch to your pole barn. It provides excellent insulation and can be stained or painted to match the surrounding environment. However, wood requires more maintenance than vinyl or metal, as it’s susceptible to moisture and rot.
Factors to Consider When Choosing Siding:
- Durability: Consider the climate and potential weather conditions your barn will face.
- Cost: Determine your budget and compare the cost of different siding materials.
- Aesthetics: Choose a siding that complements the design of your barn and its surroundings.
- Maintenance: Think about the level of maintenance you’re willing to undertake to keep your siding looking its best.
By carefully considering these factors, you can select the perfect siding material for your pole barn, ensuring a long-lasting and visually appealing exterior that meets your specific needs.
Trim Profiles: Enhancing the Aesthetic Appeal of Your Pole Barn
As you embark on the journey of constructing your pole barn, the exterior details play a significant role in defining its overall aesthetic charm. Trim profiles offer an elegant way to accentuate the architectural features of your barn, transforming it from a mere structure into a visually captivating masterpiece.
Corner trims and window casings serve as the guardians of your walls. They protect the vulnerable corners and edges from the elements, ensuring their longevity and preventing water infiltration. But beyond their practical purpose, they can also enhance the visual appeal of your barn. Choose trims that complement your siding material, whether it’s vinyl, metal, or wood, creating a cohesive and polished look.
Soffit panels play a crucial role in the ventilation of your pole barn. They allow for proper airflow, preventing moisture buildup and ensuring the health of your structure. But that doesn’t mean they can’t also be aesthetically pleasing. Select soffits that seamlessly integrate with your siding, adding an extra layer of style to your barn’s exterior.
By incorporating decorative trims into your pole barn’s design, you not only enhance its functionality but also elevate its beauty. From classic to contemporary styles, there’s a wide selection of trims available to cater to your personal taste. With careful consideration and a keen eye for detail, you can transform your pole barn into a true work of art.
Paint Selection: Enhancing Your Pole Barn’s Aesthetics
When it comes to painting your pole barn, the right color can make all the difference in its overall appearance and appeal. Choosing a paint that complements the siding material, surrounding landscape, and your personal style is crucial.
Consider the durability of the paint you choose. Pole barns are often exposed to the elements, so you’ll want a paint that can withstand the test of time and protect your investment. Water-resistant paints are a great option for preventing moisture damage, while UV-resistant paints will keep your barn looking vibrant even under intense sunlight.
Don’t be afraid to experiment with different colors. While neutral shades like white or gray are classic choices, you can also opt for bolder colors that match the style of your home or surrounding property. Darker colors like navy blue or black can give your pole barn a modern and sophisticated look, while lighter colors like beige or yellow can make it feel more inviting and spacious.
Tip: If you’re unsure about which color to choose, try painting a small sample area before committing to the entire barn. This will give you a chance to see how the color looks in different lighting conditions and against your siding material.
The finish of your paint can also impact the look and feel of your pole barn. Glossy finishes reflect more light, giving the barn a shiny and polished appearance. Matte finishes, on the other hand, absorb more light, creating a more subtle and modern look.
No matter what color or finish you choose, make sure to use high-quality paint and apply it according to the manufacturer’s instructions. This will ensure that your paint job lasts for many years to come, protecting your pole barn and enhancing its beauty.
Roofing Your Pole Barn: A Guide to Durable and Weather-Resistant Options
When it comes to protecting your pole barn from the elements, the roof is of paramount importance. Choosing the right roofing materials is key to ensuring the longevity and functionality of your structure. Factors such as climate and aesthetics play a significant role in your decision-making process.
Let’s delve into the various roofing materials available for pole barns:
Asphalt Shingles
For a cost-effective and widely used roofing option, asphalt shingles are an excellent choice. These shingles are made from asphalt-saturated fiberglass and offer a range of colors and textures to match any style. Asphalt shingles are durable and provide good protection against moisture. However, they may require replacement sooner than other materials.
Metal Roofing
If you’re seeking a long-lasting and weather-resistant roofing option, consider metal roofing. Made from materials like steel, aluminum, or copper, metal roofing provides excellent protection against fire, moisture, and insects. It’s also lightweight and easy to install, making it a practical choice for pole barns. Additionally, metal roofing offers extended durability and low maintenance requirements.
Tile Roofing
For a high-end and aesthetically pleasing roofing option, tile roofing is a fantastic choice. Made from materials such as clay, concrete, or slate, tile roofing provides excellent insulation and durability. Additionally, it’s fireproof and resistant to weather extremes. However, tile roofing can be more expensive and heavier than other materials, so consider these factors when making your decision.
Making the Right Choice
The best roofing material for your pole barn depends on your specific needs and preferences. Consider the climate in your area, the aesthetics you desire, and the budget you have allocated for the project. By carefully evaluating these factors, you can select the optimal roofing material that will protect your pole barn for years to come.
The Crucial Role of Roof Pitch in Pole Barn Construction: Ensuring Optimal Drainage and Snow Shedding
As you embark on the exciting journey of constructing a pole barn, one crucial aspect demanding meticulous attention is the roof pitch. This architectural element plays a pivotal role in ensuring proper drainage and efficient snow shedding, thereby protecting your structure and safeguarding its longevity.
The roof pitch, expressed as a ratio, indicates the steepness of the roof’s slope. A well-designed roof pitch not only enhances the aesthetic appeal of your pole barn but also ensures its structural integrity. In areas with ample rainfall, a steeper roof pitch effectively channels water away from the building, preventing leaks and potential damage to the interior.
Similarly, in regions experiencing heavy snowfall, an optimal roof pitch is essential to prevent snow accumulation. A steeper pitch allows snow to slide off the roof effortlessly, reducing the risk of collapse and ensuring year-round accessibility to your pole barn.
Determining the ideal roof pitch requires consideration of several factors, including the local climate and building code regulations. Professional guidance from an experienced builder can prove invaluable, especially in areas with extreme weather conditions. They can help you optimize the roof pitch for maximum drainage and snow shedding, ensuring that your pole barn withstands the elements.
By selecting the appropriate roof pitch, you lay the foundation for a durable and resilient pole barn that will provide years of reliable service. Whether you envision it as a workshop, storage space, or a versatile recreational area, a carefully planned roof pitch will ensure its protection and functionality for generations to come.
Ventilation: The Breath of Your Pole Barn
The air we breathe is essential for life, and the same is true for your pole barn. Proper ventilation is crucial to prevent moisture buildup, mold growth, and structural damage. Soffit and ridge vents work together to circulate fresh air, ensuring a healthy and long-lasting pole barn.
Soffit Vents: Intake for Fresh Air
Soffit vents are installed along the eaves of your barn, providing an entry point for fresh air. They allow cool, dry air to enter the barn, displacing warm, humid air that can cause condensation. These vents come in various styles, including perforated panels and screened vents, so you can choose the ones that best complement your barn’s design.
Ridge Vents: Expelling Moisture
Ridge vents are installed along the peak of your barn’s roof, serving as exhaust points for moisture-laden air. The warm, moist air rises to the highest point of the barn, where the ridge vent allows it to escape. This airflow prevents condensation from forming on the roof and walls, protecting your barn from rot and mildew.
The Perfect Balance
Proper ventilation requires a balance between intake and exhaust. Soffit vents draw in fresh air, while ridge vents expel stale air. By working together, these vents create a continuous flow of air that keeps your barn’s atmosphere fresh and dry.
Installing Vents for Optimal Airflow
Installing soffit and ridge vents is relatively straightforward. Soffit vents are typically attached to the underside of the eaves, while ridge vents are installed along the peak of the roof. Make sure to read the manufacturer’s instructions carefully to ensure proper installation and sealing.
With soffit and ridge vents in place, your pole barn will breathe easily, extending its lifespan and ensuring a comfortable environment for your belongings and activities. So, don’t neglect ventilation when building or renovating your pole barn. Remember, fresh air is the lifeblood of a healthy and durable structure.
Window Types: Choose window styles (single-hung, double-hung, casement, sliding) based on function and aesthetics.
Choosing the Right Windows for Your Pole Barn
When it comes to selecting windows for your pole barn, there’s a wide range of styles and functions to consider. The perfect window can elevate the aesthetics, functionality, and even add value to your building.
Single-Hung Windows:
These classic windows feature a single lower sash that slides vertically, while the upper sash remains fixed. They’re a great choice for smaller openings and provide a timeless, traditional look.
Double-Hung Windows:
With two operable sashes, double-hung windows offer unparalleled ventilation and light. They’re easy to clean and can provide a wider view than single-hung windows.
Casement Windows:
Casement windows hinge on one side like a door, with an outward opening sash. They’re excellent for maximizing ventilation and provide unobstructed views.
Sliding Windows:
Sliding windows feature two sashes that move horizontally to open. They’re space-efficient and easy to operate, making them ideal for smaller openings or areas where floor space is limited.
Additional Considerations:
Beyond window styles, consider the following factors when making your choice:
- Function: Will the windows primarily be used for ventilation, natural light, or both?
- Energy Efficiency: Choose windows with high energy ratings to reduce heat loss and save on energy bills.
- Aesthetics: Select windows that complement the architectural style of your pole barn and enhance its curb appeal.
- Durability: Choose windows made from durable materials, such as vinyl, aluminum, or fiberglass, to withstand the elements and provide long-term performance.
By carefully considering these factors, you can select the perfect windows for your pole barn, creating a space that’s both functional and visually appealing.
Determining Door Sizes for Your Pole Barn
When it comes to determining the appropriate door sizes for your pole barn, it’s crucial to consider both access and functionality. The size of the door will directly impact the ease with which you can move equipment, vehicles, or materials in and out of the barn.
First and foremost, consider the purpose of the barn. If it’s intended for storing large equipment or vehicles, you’ll need to ensure the door is wide and tall enough to accommodate them. Measure the height and width of your equipment to determine the minimum door size required.
Next, think about the frequency with which you’ll be using the barn and the type of access you need. If you plan on using the barn regularly, you may want a wider door for easy entry and exit. Additionally, consider the type of door you prefer, such as a sliding, swinging, or roll-up door. Each type has its own advantages and drawbacks, so choose the one that best suits your needs.
Don’t forget to factor in the height of the doorway. Make sure it’s tall enough to accommodate large equipment or vehicles without scraping or damage. As a general rule of thumb, aim for a doorway height that’s at least 8 feet in clearance for standard-sized vehicles.
Finally, consider the energy efficiency of the door. A poorly insulated or sealed door can lead to heat loss or gain, which can affect the temperature inside the barn. Look for doors that are well-insulated and have weatherstripping to minimize drafts and maintain a comfortable indoor environment.
Hardware: Enhancing Security and Convenience for a Durable Pole Barn
Introduction: When building a pole barn, don’t overlook the importance of sturdy hardware. From locks to hinges, these essential components ensure security and convenience for years to come.
Locks for Security:
Choose sturdy locks to protect your pole barn from unauthorized entry. Consider deadbolt locks or keyed padlocks for maximum security. Handle: Opt for durable handles that provide a comfortable grip, even when your hands are wet or cold.
Hinges for Smooth Operation:
Select hinges that are strong enough to support the weight of heavy doors and windows. Ball-bearing hinges offer smooth operation and extended durability. Holes: Pre-drilled holes simplify installation, saving time and effort.
Additional Hardware:
Accessorize your pole barn with additional hardware like:
* Latches: For securing doors and gates without a lock
* Hasps: To add an extra layer of security
* Chain: For restricting access to specific areas
* Door closers: To ensure doors close properly, preventing drafts and insects
Benefits of Quality Hardware:
Investing in quality hardware provides numerous benefits:
- Increased Security: Sturdy locks and hinges deter break-ins
- Enhanced Convenience: Durable handles and smooth hinges make operating doors effortless
- Extended Lifespan: Robust hardware resists wear and tear, extending the life of your pole barn
- Improved Aesthetics: Hardware with elegant finishes complements the overall design
Conclusion:
When building or renovating a pole barn, don’t compromise on hardware. By choosing sturdy locks, handles, and hinges, you’ll not only enhance security but also create a more convenient and durable structure that stands the test of time.
Electrical Safety in Pole Barn Construction: Adhering to Codes
As you embark on the exciting journey of constructing your pole barn, ensuring electrical safety should be paramount. Adhering to local electrical codes is not merely a regulatory requirement; it’s a testament to your commitment to protecting your family, property, and anyone who may inhabit your barn in the future.
Electrical codes are established by local authorities to minimize the risk of electrical fires, shocks, and other hazards. By following these guidelines, you can rest assured that your pole barn’s electrical system is installed in a safe and reliable manner.
Here are some crucial aspects of electrical code adherence that you should keep in mind:
-
Use Approved Materials: Choose electrical components that have been tested and approved by reputable organizations like UL (Underwriters Laboratories) or ETL (Intertek). This ensures that the materials meet stringent safety standards.
-
Proper Wiring Techniques: Pay meticulous attention to the wiring methods outlined in the electrical code. This includes using the correct wire sizes for the load requirements, securing wires properly, and avoiding overloading circuits.
-
Grounding and Bonding: Ensure that all electrical equipment is properly grounded and bonded. This creates a path for electrical faults to discharge safely, preventing dangerous shocks and fires.
-
Protect from the Elements: Outdoor electrical components, such as lights and outlets, must be protected from the harsh elements using weatherproof enclosures. This helps prevent moisture and debris from compromising the electrical system.
-
Inspections and Permits: Before energizing your electrical system, obtain an electrical inspection from a qualified electrician. This will ensure that the installation meets all applicable codes and is safe to operate.
Remember, electrical safety is not a burden but an investment in the well-being of your family and property. By adhering to local electrical codes, you can create a pole barn that is not only functional but also safe and reliable for years to come.
Wiring Materials: Choosing the Right Wires for Your Pole Barn
When it comes to wiring your pole barn, selecting the appropriate wire sizes and types is crucial to ensure safety and compliance with local electrical codes. The right wires will handle the electrical load requirements of your barn without overheating or causing electrical hazards.
Wire Size:
The thickness or gauge of the wire determines its current-carrying capacity. Larger wire sizes can carry more current safely, so use thicker wires for circuits with higher electrical loads. For example, a 12-gauge wire is suitable for 20-amp circuits, while a 10-gauge wire is used for 30-amp circuits.
Wire Type:
There are various types of wires available, each with its own benefits and applications:
- Solid Wire: Solid copper wire is durable and ideal for permanent wiring.
- Stranded Wire: Stranded wire consists of multiple strands of copper and is more flexible, making it easier to bend and work with.
- Copper Wire: Copper is the most common wire material due to its excellent conductivity and corrosion resistance.
- Aluminum Wire: Aluminum wire is lighter and cheaper than copper, but it has a lower conductivity and may require larger sizes for the same current capacity.
Determining Electrical Load Requirements:
To determine the appropriate wire sizes, you need to calculate the electrical load of your barn. This involves adding up the wattage of all the electrical devices and appliances you plan to use. Once you have the total wattage, divide it by the voltage (120 volts for most residential applications) to get the total amperage. This value will help you determine the minimum wire size required.
Additional Tips:
- Use conduit or cable: Running wires inside conduit or cable helps protect them from damage and moisture.
- Proper connections: Make sure all electrical connections are tight and secure to prevent arcing and overheating.
- Ground your system: Connect your electrical system to a ground rod to provide a safe path for fault currents.
- Hire a licensed electrician: If you’re not comfortable working with electricity, it’s best to hire a licensed electrician to ensure the safety and code compliance of your pole barn’s electrical system.
Plan for Adequate Lighting in Your Pole Barn: A Guide to Illumination
When designing the electrical system for your pole barn, lighting is paramount for both functionality and aesthetics. A well-lit workspace enhances visibility, increases productivity, and promotes a safe environment. Here’s a comprehensive guide to planning adequate lighting fixtures inside and outside your pole barn:
Exterior Lighting
Exterior lighting provides security, safety, and ambiance around your pole barn. Consider these factors:
- Security: Motion-activated or dusk-to-dawn lights can deter intruders and illuminate potential hazards.
- Accessibility: Floodlights or path lighting can guide you to your barn safely, especially at night.
- Aesthetics: Accent lighting can highlight architectural features and create a welcoming atmosphere.
Interior Lighting
Interior lighting plays a crucial role in creating a productive workspace. Here are some tips:
- Task Lighting: Focus on areas where you perform specific tasks, such as workstations or tool storage. Use under-cabinet lighting for countertops or pendant lights for workstations.
- Ambient Lighting: Overhead fluorescent or LED lights provide general illumination throughout the barn. Ensure even distribution of light for optimal visibility.
- Natural Lighting: Skylights or large windows can harness natural light during the day, reducing electricity consumption.
Fixture Selection
Choosing the right lighting fixtures is essential for functionality and aesthetics.
- Durability: Choose fixtures that are resistant to dust, moisture, and extreme temperatures, especially for outdoor areas.
- Energy Efficiency: Consider LED bulbs for their long lifespan and low energy consumption.
- Style: Match the fixtures to the overall design aesthetic of your pole barn. From industrial pendants to rustic sconces, there are options to suit any décor.
By following these guidelines, you can design a robust and functional lighting system that will enhance the safety, productivity, and overall enjoyment of your pole barn.
Plumbing Fixtures: Essential Components for Pole Barn Functionality and Comfort
In the intricate symphony of pole barn construction, plumbing fixtures play a crucial role in transforming a mere structure into a space of convenience and functionality. From the refreshing flow of water from sinks to the hygienic removal of waste through toilets, these fixtures are the lifeline of any interior space.
Sinks: A Hub of Utility and Convenience
Sinks are indispensable for a wide range of everyday tasks, from washing hands to preparing food. When selecting a sink for your pole barn, consider both its functionality and aesthetic appeal. Opt for durable materials like stainless steel or porcelain that can withstand heavy use. Additionally, choose a size and shape that complements the space available and meets your specific needs.
Toilets: Maintaining Hygiene and Privacy
Toilets are essential for maintaining a hygienic environment and privacy within the pole barn. Choose toilets that are comfortable to use and easy to clean. Consider models that feature water-saving technology to reduce your environmental impact and utility bills. Ensure proper ventilation to prevent odor buildup, creating a fresh and inviting atmosphere.
Other Fixtures: Enhancing Comfort and Functionality
Beyond sinks and toilets, a variety of other fixtures can enhance the functionality and comfort of your pole barn. Install a shower for quick and convenient cleanup after a day of work or recreation. Washing machines and dryers allow you to tackle laundry tasks without leaving the comfort of your property. Water heaters provide a steady supply of hot water, ensuring year-round comfort.
Planning and Installation: A Blueprint for Plumbing Success
Proper planning and installation are paramount for a successful plumbing system. Consult with a licensed plumber to determine the optimal layout and equipment for your specific needs. Adhere strictly to local building codes and hire qualified installers to ensure the safety and longevity of your plumbing fixtures.
Maintenance: Ensuring Optimal Performance
Regular maintenance is crucial to keep your plumbing fixtures functioning at their best. Clean sinks and toilets regularly to prevent clogs and buildup. Inspect pipes and fixtures for leaks or damage and address any issues promptly. By following these simple maintenance tips, you can prolong the lifespan of your plumbing system and ensure its reliable performance for years to come.
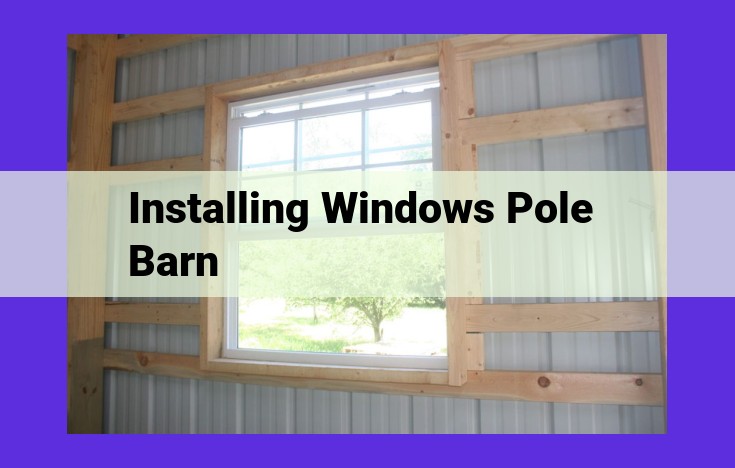
Installing Windows in a Pole Barn: A Step-by-Step Guide
Step into the realm of pole barn construction and embark on a journey to illuminate your barn with natural light. Installing windows in a pole barn may seem daunting, but with careful planning and a bit of elbow grease, you can transform your barn into a bright and inviting space.
Choosing the Right Pipes for Plumbing
When it comes to plumbing, durable pipes are your steadfast companions, ensuring the smooth flow of water without succumbing to corrosion or leaks. Opt for pipes that can withstand the rigors of your barn environment, whether it’s the harsh elements or the occasional heavy machinery.
Framing and Sheathing: The Backbone of Your Windows
Before installing your windows, you’ll need to construct a sturdy frame and sheathing. Use pressure-treated lumber or metal studs for the framing, as these materials are built to last in the face of moisture and insects. Secure the framing with nails, screws, or bolts to prevent movement and ensure your windows remain snugly in place.
Next up is the sheathing, which provides structural support for your siding and serves as a base for insulation. Oriented strand board (OSB), plywood, or fiber cement are all excellent choices for sheathing, offering both strength and weather resistance.
Insulation: Keeping the Heat In and the Cold Out
Don’t let the cold drafts or scorching heat spoil the comfort of your pole barn. Add a layer of insulation to your walls and ceiling to regulate temperature and boost energy efficiency. Fiberglass, cellulose, or spray foam insulation are all effective options, each with its own unique advantages.
To prevent moisture buildup, which can lead to mold and rot, install vapor barriers along with your insulation. These barriers will keep the moisture out, ensuring your barn remains a dry and healthy environment.
Siding and Trim: The Face of Your Pole Barn
Your barn’s siding and trim play a crucial role in its aesthetics and durability. Choose siding materials like vinyl, metal, or wood, depending on your preference for style, cost, and longevity. Enhance the look with decorative trims, such as corner casings, window casings, and soffit, to add character and charm to your barn.
Don’t forget the finishing touch: paint. Not only will it protect your siding from the elements, but it will also give your barn a pop of color and style. Choose a paint that complements your barn’s surroundings and reflects your personal taste.
Septic Systems: A Crucial Step for Pole Barn Plumbing
When constructing a pole barn, ensuring proper wastewater management is essential. Septic systems provide a reliable and environmentally friendly solution for wastewater disposal in areas without access to municipal sewer systems.
Designing the Septic System
The design of a septic system for a pole barn requires careful planning. Factors to consider include:
- Size: The size of the septic tank and leach field must be adequate to handle the expected wastewater flow.
- Type: Choose a septic tank that meets the specific needs of your pole barn, such as a gravity-fed or pump-fed system.
- Location: Locate the septic tank and leach field in a suitable area with proper drainage and away from water sources.
Installation Process
Installing a septic system involves several steps:
- Excavation: Dig a hole for the septic tank and trenches for the leach field.
- Tank Placement: Place the septic tank in the excavated hole and connect it to the plumbing system.
- Leach Field Installation: Lay perforated pipes in the trenches and cover them with gravel.
- Backfilling: Fill the hole and trenches with soil, tamping it down to ensure stability.
Maintenance and Monitoring
Regular maintenance is crucial for the proper functioning of a septic system. Pumping the septic tank every few years removes sludge buildup and prevents overflows. Routine inspections of the leach field can also detect any potential issues.
By designing and installing a septic system, you ensure that your pole barn has the necessary infrastructure for wastewater management. This investment will contribute to the overall comfort and functionality of your space.
Paint Colors: Enhance the interior and exterior aesthetics with paint colors that complement the design.
Deck Out Your Pole Barn with Picture-Perfect Paint Colors
Transform Your Barn into a Masterpiece
As you put the finishing touches on your pole barn, it’s time to unleash your artistic flair with paint colors that will elevate its aesthetics and make it a true statement piece. Here’s how to paint your way to perfection:
Exterior Color Palette
Consider the surroundings when choosing your exterior hue. For a blend with nature, opt for earthy tones like brown, green, or gray. A classic white will brighten the space and create a timeless charm. If you prefer a more bold and modern look, experiment with navy blue, charcoal gray, or even a fiery red.
Interior Tranquility
Inside the barn, the color scheme should create a welcoming and functional atmosphere. For a cozy retreat, opt for warm and inviting hues like beige, cream, or light gray. If you’re using the barn for workshops or hobbies, consider a more practical color like light blue or green to reduce eye strain.
Accentuate with Hardware
Hardware can be the jewelry of your paint job. Choose finishes that complement your color choices and add a touch of sophistication. Black or brushed aluminum handles, hinges, and lighting fixtures can enhance a modern aesthetic, while antique brass or brushed copper adds a rustic touch.
Strike the Right Balance
Remember, moderation is key. While it’s tempting to go all out with bold colors, too much can overwhelm the space. Balance vivid hues with more neutral shades to create a harmonious and stylish ambiance.
Timeless Style
Choose paint colors that transcend time. Classic colors like white, black, gray, and navy will never go out of style. If you decide to repaint in the future, a neutral base will make the transition smoother.
Embracing the Outdoors
Don’t be afraid to extend your paint palette outdoors. Create a cohesive flow by painting outdoor structures like fences, gates, or sheds in colors that complement your barn. This will enhance the overall look and create a sense of unity.
Lasting Impression
Invest in high-quality paint that will withstand the elements and keep your colors looking vibrant for years to come. Durable exterior paints can protect your barn from sun damage, rain, and wind, while indoor paints will provide a washable and fade-resistant finish.
By following these tips and letting your creativity soar, you can transform your pole barn into a masterpiece that will be the envy of all who set foot inside.
**Mastering the Art of Pole Barn Windows: A Comprehensive Installation Guide**
In the realm of pole barn construction, windows serve as portals of light and ventilation, enhancing both functionality and aesthetics. Installing windows in a pole barn may seem like a daunting task, but with meticulous planning and careful execution, you can create elegant and well-lit spaces that cater to your unique needs.
Hardware Finishes: A Touch of Style and Durability
Hardware finishes play a pivotal role in completing the visual appeal and ensuring the longevity of your pole barn windows. When selecting hardware finishes, consider the overall design theme of your barn and the functionality required.
- Brushed Nickel: This timeless finish exudes a sophisticated sheen that complements both modern and traditional designs. Its resistance to corrosion and fading makes it an ideal choice for areas exposed to moisture.
- Oil-Rubbed Bronze: This warm and inviting finish adds a touch of elegance to rustic or industrial-style barns. Its antimicrobial properties and durability make it an excellent choice for high-traffic areas.
- Satin Black: This sleek and versatile finish adds a touch of modern simplicity to any pole barn. Its powder-coated surface provides exceptional resistance to scratches and wear.
- Matte Black: Similar to satin black, matte black offers a sophisticated and low-profile option. Its non-reflective surface creates a stunning contrast against brighter colors.
Beyond aesthetics, hardware finishes also enhance the durability and functionality of your windows. Choose hardware that is resistant to rust and corrosion to ensure longevity in harsh outdoor conditions. For easy operation, opt for hardware with ergonomic handles that provide a comfortable grip.
Additional Tips for a Seamless Window Installation
- Thoroughly inspect the window frames and hardware for any defects or damage before installation.
- Seal all gaps around the window opening to prevent air and moisture infiltration. Use high-quality caulk or weatherstripping for a tight seal.
- Install window screens to keep out insects and debris while allowing for ventilation.
- Consider adding curtains or blinds for privacy and light control. Choose fabrics that complement the hardware finishes and overall design of your pole barn.
- Regularly clean and maintain your windows to ensure optimal performance and longevity. Use non-abrasive cleaners and avoid using harsh chemicals that could damage the finishes.
The Final Flourishes: Enhancing Your Pole Barn with Decorative Touches
As you approach the completion of your pole barn masterpiece, it’s time to add the finishing touches that will transform it from a mere structure into a space that reflects your style and functionality. Embrace the opportunity to personalize your pole barn with these decorative elements that enhance both its aesthetic appeal and practicality.
Curtains: Drapery Drama
Draperies are not just for homes anymore. In a pole barn, they can add a touch of warmth and elegance, creating a cozy and inviting atmosphere. Consider using fabrics that complement your siding and interior design, such as sheer curtains for a touch of lightness or velvet curtains for a more dramatic effect.
Blinds: Modern Minimalism
If you prefer a more modern and streamlined look, blinds are an excellent choice. Available in various materials such as aluminum, wood, and faux wood, blinds provide excellent light control and privacy. Choose blinds with adjustable slats to customize the amount of light and airflow you want.
Accent Lighting: Illuminating Ambiance
Strategic lighting can transform your pole barn into a functional and visually appealing space. Install under-cabinet lighting to illuminate work areas, add wall-mounted sconces to create a warm glow, or suspend pendant lights from the ceiling for a touch of industrial charm.
By incorporating these decorative elements into your pole barn, you not only enhance its aesthetic appeal but also create a space that is both comfortable and practical. Embark on this final step of your pole barn journey with a creative spirit, allowing these finishing touches to elevate your space into an exceptional retreat.