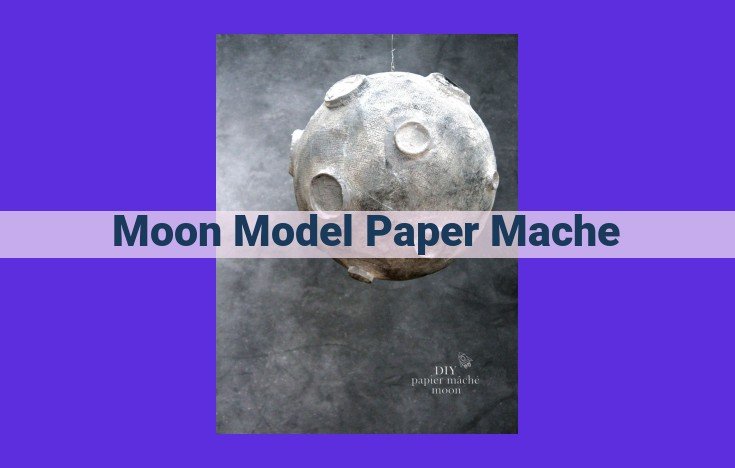
Create A Lifelike Paper Mache Lunar Orb: A Detailed Guide
Craft a paper mache moon model using crafting paper, paste, and balloons. Tear or cut paper into strips, dip in paste, and apply to an inflated balloon, creating multiple layers. Use shaping tools to mold the wet paper mache into craters and mountains. Paint the dried model with acrylic or tempera paints for lunar surface details. Dry the paint and protect it with a clear acrylic spray seal for a realistic and durable moon model.
Create a Mesmerizing Paper Mache Moon Model: A Comprehensive Guide
Ignite your creativity and embark on a captivating journey as you craft an astounding paper mache moon model. Dive into the world of papier-mâché, where ordinary crafting materials transform into celestial wonders.
Materials Required:
Gather the essential elements to embark on this artistic endeavor:
-
Crafting Paper: Opt for resilient Kraft paper or repurpose old newspapers to create the foundation of your moon.
-
Paste: Prepare a versatile adhesive using a simple mixture of flour and water.
-
Balloons: Choose a substantial balloon as the canvas for your lunar masterpiece.
Step-by-Step Guide:
Embark on the transformative process of paper mache, layer by layer:
1. Layering Technique:
-
Tear or cut strips of crafting paper, ensuring manageable sizes for ease of application.
-
Dip the paper strips into the prepared paste, ensuring thorough saturation.
-
Apply the moistened strips to the inflated balloon, overlapping them to create multiple layers.
-
Allow each layer to dry before proceeding to the next, building strength and durability.
2. Shaping Techniques:
-
While the paper mache is still pliable, employ shaping tools such as wire, toothpicks, or skewers.
-
Gently mold the surface to create realistic moon craters and majestic mountains.
-
Experiment with different techniques to achieve desired contours.
3. Painting Techniques:
-
Once the model is completely dry, unleash your artistic flair.
-
Use acrylic or tempera paints to depict the intricate details of the lunar surface.
-
Choose hues that mimic the craters (gray) and highlands (white).
-
Enhance the realism with subtle shading and highlights.
4. Drying and Sealing:
-
Allow the painted masterpiece to dry thoroughly.
-
Protect your creation by applying a clear acrylic spray, enhancing its appearance and safeguarding the paint.
Essential Equipment for Crafting a Captivating Paper Mache Moon Model
Embarking on the journey of crafting a paper mache moon model requires not only the right materials but also a few essential tools to shape and mold it into a celestial masterpiece. These tools will empower you to transform your vision into reality, adding depth, texture, and realism to your lunar creation.
-
Wire: Bendable wire serves as a versatile tool for shaping and supporting the paper mache layers. It can be used to create intricate contours, craters, and mountains, allowing you to sculpt the moon’s surface with precision.
-
Toothpicks: Small, sturdy toothpicks are ideal for adding fine details and delicate features to your moon model. Use them to refine edges, create craters, or etch intricate patterns into the surface, bringing a touch of cosmic elegance to your artwork.
-
Skewers: Longer skewers, akin to toothpicks’ extended cousins, offer greater reach and stability when working on larger areas. Their strength makes them perfect for shaping broader contours, smoothing surfaces, and ensuring the moon’s overall form takes shape flawlessly.
Craft a Majestic Paper Mache Moon Model: A Step-by-Step Guide
Step into the captivating world of paper mache and embark on a journey to create your own celestial masterpiece – a breathtaking paper mache moon model. Gather your crafting comrades and let’s embark on this lunar adventure together!
Materials Required:
- Crafting paper (strong and durable)
- Paste (homemade or store-bought)
- Balloons (large and sturdy for the moon’s shape)
Layering Technique: The Foundation of Durability
To lay the foundation for a sturdy and long-lasting moon model, we’ll employ the layering technique. Gather your trusty crafting paper and tear or cut it into thin strips. Prepare a bowl of well-mixed paste that will act as the adhesive.
Dip each paper strip into the paste, making sure to soak it thoroughly. Gently apply the moistened strips to the inflated balloon, overlapping them to create multiple layers. Repeat this process, adding layer upon layer until the balloon is completely covered.
Shaping Techniques: Embracing the Lunar Landscape
Once the paste has set and the paper mache has dried slightly, it’s time to mold and shape our moon model. Employ your shaping tools, such as wire, toothpicks, or skewers, to gently press and manipulate the paper mache. Create craters, mountains, and other lunar features to bring your moon to life. Allow your imagination to soar and let the model take shape.
Painting Techniques: Unveiling the Lunar Tapestry
With the moon’s form established, it’s time to paint its iconic surface. Choose acrylic or tempera paints in shades of gray, white, and black. Dip your brush into the paint and carefully dab and stroke it onto the model’s surface. Use light and dark hues to depict the craters, highlands, and other captivating lunar details.
Shaping Techniques for Your Paper Mache Moon: Sculptural Storytelling
As your paper mache moon model gracefully adorns your inflated balloon, it’s time to embark on the captivating journey of shaping its surface. Picture yourself as a celestial sculptor, transforming this blank canvas into a breathtaking replica of our celestial neighbor.
To begin, imagine your shaping tools as chisels and mallets in your artistic arsenal. Wire will serve as your chisel, deftly carving out intricate craters and rugged landscapes. Toothpicks or skewers will act as your mallets, gently shaping and molding the paper mache as it slowly dries.
With your tools in hand, immerse yourself in the artistry of manipulating the paper mache while it’s still pliable. Press gently into it, guiding it into the depths of craters and the peaks of lunar mountains. Allow your fingers to dance across the surface, creating realistic textures and imperfections.
Craters, those celestial scars, are born through your skillful use of wire. With precision and patience, poke and prod into the paper mache, creating indentations that mimic the lunar landscape. Vary the size and depth of these craters, giving your moon a sense of age and history.
Mountains, on the other hand, arise from the gentle touch of toothpicks or skewers. Slowly push and prod the paper mache upwards, forming towering peaks and rolling hills. Experiment with different heights and slopes, creating a diverse lunar topography that will captivate the eyes of all who behold it.
Remember, the essence of these shaping techniques lies in embracing the organic nature of paper mache. Allow the process to unfold, guided by your imagination and the unique qualities of the material. With every touch, you’ll breathe life into your moon model, transforming it from a mere balloon into a celestial masterpiece.
Painting Your Paper Mache Moon: A Celestial Canvas
As your paper mache moon bask in its glorious completion, it’s time to don your artistic hat and transform it into a lunar masterpiece. Painting your moon is a journey akin to painting the vast, celestial tapestry above. Here’s your guide to capturing the ethereal beauty of our cosmic neighbor:
Color Palette of the Lunar Landscape
Craters: Embrace shades of *gray*, from *light ash* to *charcoal*. These hues will mimic the shadows cast by the lunar craters, creating an illusion of depth.
Highlands: Opt for *pale yellow*, *cream*, and *off-white*. These colors represent the sunlit peaks and plains of the moon’s surface, adding contrast and texture.
Brush Techniques for a Realistic Lunar Surface
Dry Brushing: Dip your brush lightly in paint and gently brush it over the surface. This technique creates subtle highlights and shadows, replicating the fine details of the lunar landscape.
Stippling: Use a stiff brush to create tiny dots of paint. This method adds texture and simulates the pitted surface of the moon.
Layers of Lunar Beauty
Begin with a base coat of *light gray*, allowing it to dry thoroughly. Then, apply layers of *darker gray* to create shadows in the craters. Once dry, use a dry brush to highlight the ridges and peaks.
For the highlands, apply a coat of *pale yellow*. Add *cream* and *white*, blending them together to create a textured and luminous surface.
Drying and Sealing: Preserving Your Lunar Creation
Allow the paint to dry completely. Then, seal your masterpiece with a clear acrylic spray. This protective layer will preserve the colors and prevent smudging, ensuring your moon will retain its celestial beauty for years to come.
Drying and Sealing: Preserving Your Lunar Masterpiece
Once your painted moon model has proudly displayed its celestial beauty for all to admire, it’s time to safeguard its radiant glow. Allow the paint to fully dry, soaking up the sun’s warm embrace or the gentle caress of a fan’s breeze.
To ensure the longevity of your lunar artwork, a protective shield must be cast. A clear acrylic spray, like a knight in shining armor, stands ready to defend your model from the ravages of time. With a steady hand, apply an even coat of this liquid guardian, encasing it in a transparent shield.
Not only will this sealant protect your creation from scratches and the wear and tear of eager little hands, but it will also enhance its visual splendor. The painted surface will gain a glossy sheen, reflecting light like the moon’s own ethereal glow.
So, as you admire your paper mache moon model, its craters and mountains frozen in a moment of cosmic wonder, rest assured that its beauty and integrity will endure, thanks to the magic of drying and sealing.